In my previous post, we learned how to build a chat application with Rails, Faye and the Private Pub gem. Now that we have our chat app working locally, we are ready to deploy!
The publish-subscribe model that our chat application is employing requires that our app maintain an open connection to a second server. This second server, our Faye server, is listening to certain channels of our Rails app, receiving post requests when new messages are created and sending those new messages back to clients subscribed to certain channels, participating in certain chats.
In our development environment, it was easy to maintain the connection to our Faye server. To refresh your memory, we:
-
Installed the Private Pub gem
-
ran the
rails g private_pub:installcommand to generate our private_pub.yml file. -
racked up the Faye server, running on localhost:9292 in another terminal window.
That’s all we need for our subscribe_to and publish_to helper methods to send and receive data on the Faye server.
How can we maintain a connection between our app and the Faye server remotely?
For Rails developers, Heroku is a very popular place to deploy our apps. Deploying our chat application to Heroku is relatively straightforward—we’ll need to create and deploy a bare bones application that will use the Private Pub gem and Faye to connect our chatting app. This application will stand in for the second server we were running locally in our development environment.
Creating Your Private Pub App
The structure and contents of your private pub app are simple. Remember that the only purpose of this app is to have a server running that connects to/listens to your chat app. I’ve called my app “priv-pub”, but you can call it anything you want (actually you have to call it something else because now that Heroku address is taken, sorry). Let’s begin:
-
In your command line, create a new directory for your app:
mkdir heroku_private_pub -
Create a github repo for this project and connect your local to your remote repository.
-
Your file structure should look like this:
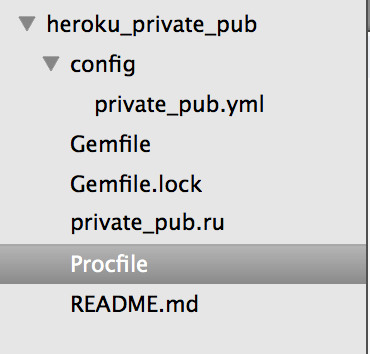
-
Deploy this app to Heroku. You should already have a Heroku account, so in your command line,
executeheroku create <app name>. Then push to heroku:git push heroku master. -
Add the following to
config/private_pub.yml:
production:
  server: "https://< app name >.herokuapp.com/faye"

#this is the address of this heroku app once you’ve deployed it, plus the `/faye` extension.

  secret_token: XXXXX
  signature_expiration: 3600 # one day
Your secret token is the token generated by your installation of the private_pub gem in your chat app. You’ll find your token in config/private_pub.yml in your chat app.
- Add the following to your gem file and bundle install
source 'https://rubygems.org'

gem 'private_pub'
gem 'thin'
gem 'foreman'
# Run with: rackup private_pub.ru -s thin -E production
require "bundler/setup"
require "yaml"
require "faye"
require "private_pub"

Faye::WebSocket.load_adapter('thin')

PrivatePub.load_config(File.expand_path("../config/private_pub.yml", __FILE__), ENV["RAILS_ENV"] || "production")
run PrivatePub.faye_appweb: bundle exec rackup private_pub.ru -s thin -p $PORT -E production8 . Push to Heroku
We’re almost done. Now that our Faye server is up and running, we need to tell our chat application to talk to it.
In config/private_pub.yml in your chat app, your production configuration to should specify the server of your new bare-bones, Faye app:
production:
  server: "https://.herokuapp.com/faye"
  secret_token: “XXXXXXXX
  signature_expiration: 3600 # one hour
And that’s it! You’re ready to deploy your chat app by creating a Heroku app for it and pushing to Heroku master. No further steps required to start chatting!