In my apparently never-ending quest to do more Action Cable all the time, I decided to tackle a implementation of Rail 5's Action Cable with multiple chatroom subscriptions.
While the newly updated Rails docs provide excellent explanations and examples, there does seem to be a dearth of info on setting up multiple, dynamic, subscriptions. So, this blog is my humble attempt to fill in that gap.
Many of the core Action Cable concepts were covered in my earlier article for the Heroku blog, so this post will be light on background and heavy on how to do the thing.
Let's go!
You can check out the completed code for this post here. You can follow along by forking and cloning the repo, and checking out the starting-state branch.
Application Background
A quick overview of the app--
This application is a super simple chatting app in which users sign in to create chatrooms and start chatting in real-time with other authenticated users.
The app has three models: User, Chatroom and Message. A message belongs to a user and a chatroom, and users and chatrooms both have many messages.

You can clone down the starter code for this tutorial here if you want to code-along.
Configuring Action Cable
First, make sure the the redis gem is un-commented out in your Gemfile, and run bundle install.
Our Redis configuration goes in config/cable.yml and should look like this:
production: &production
  adapter: redis
  url: redis://10.10.3.153:6381
development: &development
  adapter: redis
  url: redis://localhost:6379
test: *development
Next up, we'll mount the Action Cable server on a sub-URI of our main server, /cable.
# config/routes.rb

Rails.application.routes.draw do
  ...
  # Serve websocket cable requests in-process
  mount ActionCable.server => '/cable'
end
Now we'll instantiate our Action Cable consumer on the client-side, telling it to initiate a WebSocket request, and maintain a persistent connection with ws://localhost:3000/cable.
// app/assets/javascripts/channels/chatrooms.js

//= require cable
//= require_self
//= require_tree .

(function() {
  this.App || (this.App = {});

  App.cable = ActionCable.createConsumer();

}).call(this);
We'll make sure that our application.js manifest file is requiring everything in the app/assets/javasciprts/channels subdirectory:
// app/assets/javascripts/application.js

//= require jquery
//= require jquery_ujs
//= require turbolinks
//= require bootstrap-sprockets
//= require_tree ./channels
Okay, Action Cable should be fully configured now. We're ready to build out the Messages Channel and the client-side subscription to that channel.
Coming Up...
The Rails docs seem to structure their Action Cable examples in three phases:
- Authorizing the connection
- Setting up the parent channel
- Connecting the consumer
Let's follow those same steps here.
Establishing and Authorizing the Connection
In your fancy new Rails 5 app, you'll have noticed that you have a file, app/channels/application_cable/connection.rb.
Here our connection class is defined.
module ApplicationCable
  class Connection < ActionCable::Connection::Base

  end
end
A connection instance gets instantiated from this class every time a WebSocket request is accepted by the server. So, when our client-side consumer code (which we just built out in app/assets/javascripts/channels/chatrooms.js), sends that WebSocket upgrade request, the server will produce a new connection object.
This object will be the parent of all of the channel subscriptions you go on to create.
Since a new connection is instantiated every time a consumer sends the initial WebSocket request, forming a connection-consumer pair, this is the perfect place to authorize the incoming request, and find the current user.
Luckily for us, Action Cable's Connection class offers some callback methods for us to use to achieve this.
# Be sure to restart your server when you modify this file. Action Cable runs in a loop that does not support auto reloading.
module ApplicationCable
  class Connection < ActionCable::Connection::Base
    identified_by :current_user

    def connect
      self.current_user = find_verified_user
    end

    protected
      def find_verified_user
        if current_user = User.find_by(id: cookies.signed[:user_id])
          current_user
        else
          reject_unauthorized_connection
        end
      end
  end
end
The connect method will be called for us when the consumer sends the WebSocket request, triggering a new instance of Connection to be born. Here we'll retrieve and set the current user, plucking the user ID from the cookies, which we set when we initially logged in our user.
We set our identifier to current_user. The connection identifier can be used to find the specific connection. It's important to note that the method we mark as our identifier will create a delegate by the same name on any channel instances that are associated with this connection. This is perfect for us, since it will allow us to use the method, current_user, in our Messages Channel.
Let's go ahead and build that channel now.
Defining the Messages Channel
# app/channels/messages_channel.rb

class MessagesChannel < ApplicationCable::Channel
  def subscribed
    stream_from 'messages'
  end
end
When the client-side subscription code gets invoked (coming soon!), it triggers the MessagesChannel#subscribed method, which streams messages that are broadcast to this channel, passing them along to the App.messages.received function.
Furthermore, our Messages Channel instance will be associated to the connection instance we previously established.
Let's pop a binding.pry into our subscribed method and check it out!
pry(#<MessagesChannel>)> self.connection
=> #<ApplicationCable::Connection:0x007ff26e6056b8
 @_internal_subscriptions=
  [["action_cable/Z2lkOi8vY2hhdHR5L1VzZXIvOA",
    #<Proc:0x007ff26e534928@/Users/SophieDeBenedetto/.rvm/gems/ruby-2.3.1/gems/actioncable-5.0.0.beta3/lib/action_cable/connection/internal_channel.rb:14 (lambda)>]],
 @connection_identifier="Z2lkOi8vY2hhdHR5L1VzZXIvOA",
 @current_user=
  #<User:0x007ff26e537510
   id: 8,
   username: "sophie",
   created_at: Sun, 25 Sep 2016 22:06:02 UTC +00:00,
   updated_at: Sun, 25 Sep 2016 22:06:02 UTC +00:00>,
 @env=
  {"rack.version"=>[1, 3],
   "rack.errors"=>#<IO:<STDERR>>,
   "rack.multithread"=>true,
   "rack.multiprocess"=>false,
   "rack.run_once"=>false,
   "SCRIPT_NAME"=>"/cable",
   "QUERY_STRING"=>"",
   "SERVER_PROTOCOL"=>"HTTP/1.1",
   "SERVER_SOFTWARE"=>"puma 3.4.0 Owl Bowl Brawl",
   "GATEWAY_INTERFACE"=>"CGI/1.2",
   "REQUEST_METHOD"=>"GET",
   "REQUEST_PATH"=>"/cable",
   "REQUEST_URI"=>"/cable",
   "HTTP_VERSION"=>"HTTP/1.1",
   "HTTP_HOST"=>"localhost:3000",
   "HTTP_CONNECTION"=>"Upgrade",
   ...
[3] pry(#<MessagesChannel>)> self.connection.class
=> ApplicationCable::Connection
We're therefore assured that our Messages Channel instance will respond to the #current_user method by delegating it to the connection instance.
Subscribing to the Messages Channel
We'll have to tell the client to subscribe to any content broadcast by our messages channel.
// app/assets/javascripts/channels/messages.js

App.messages = App.cable.subscriptions.create('MessagesChannel', {
  received: function(data) {
    $("#messages").removeClass('hidden')
    return $("[data-chatroom='" + data.chatroom_id + "']").append(data.message);
  }
});
Here, we establish our subscription to the Messages Channel, and define a received function. We can even hop into the browser and look at our App and App.messages objects.
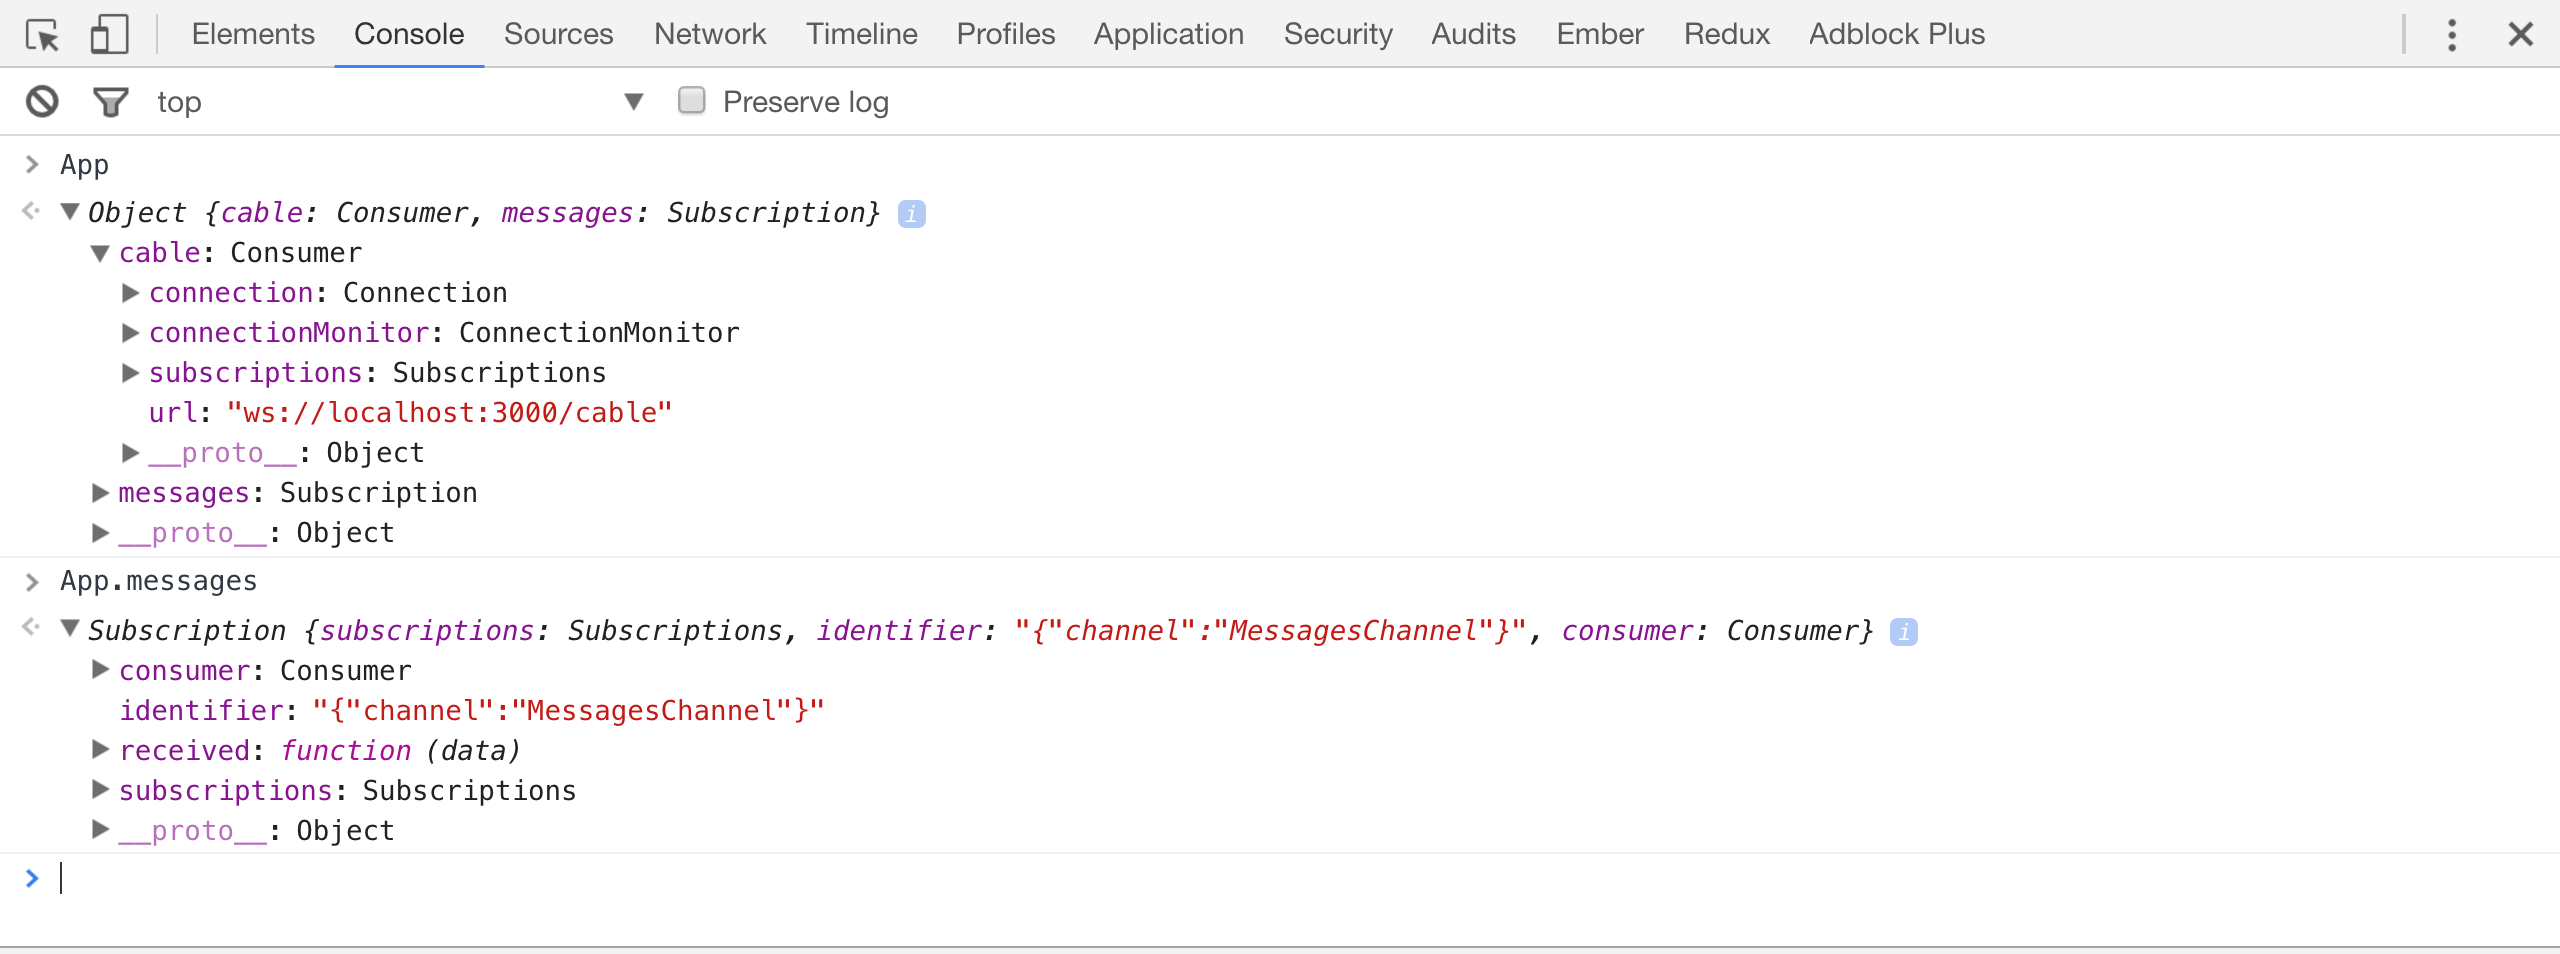
We can see that our App object contains the socket URL with which it is maintaining a connection: ws://localhost:3000/cable.
And we can see that the App.messages object is an instance of an Action Cable Subscription. It knows that it is subscribing to the Messages Channel and it knows about its received function.
This function is actually a callback function. It will be automatically invoked for us every time Action Cable broadcasts data to the Messages Channel.
But, you may be wondering, when will new messages be broadcast?
Well, here is the beauty of Action Cable--we can totally forgo the use of the Messages Controller and any messages routes, and instead handle all of our message creating and broadcasting here in the Messages Channel, with a little help from some additional super cool Rails 5 features.
Sending Messages for Broadcast, from the Client-Side
The App.messages subscription object that we just examined responds to a function, send, that will send data to our Messages Channel to be broadcast.
So, we'll write a function that will fire when someone hits enter on the new messages form. At that point in time, we'll tell App.messages to send the new message content to the channel.
// app/assets/javascripts/channels/messages.js

App.messages = App.cable.subscriptions.create('MessagesChannel', {
  received: function(data) {
    $("#messages").removeClass('hidden')
    return $("[dat
a-chatroom='" + data.chatroom_id + "']").append(data.message);
  }
});

$(document).on('turbolinks:load', function() {
  submitNewMessage();
});

function submitNewMessage(){
  $('textarea#message_content').keydown(function(event) {
    if (event.keyCode = = = 13) {
        var msg = event.target.value
        var chatroomId = $("[data-chatroom]").data().chatroom
        App.messages.send({message: msg, chatroom_id: chatroomId})
        $('[data-textarea="message"]').val(" ")
        return false;
     }
  });
}
This is where the magic happens:
App.messages.send({message: msg, chatroom_id: chatroomId})
Having collected the new message content and the ID of the chatroom to which the message is being posted, we sent it along to the Messages Channel.
However, the Messages Channel still has to broadcast that new message out to all of the subscribed clients.
So, you might be wondering, how does the Messages Channel receive the data sent by App.messages.send? And how does it broadcast new messages?
Well, the Subscription instance's send function corresponds to the subscription's channel's receive function.
# app/channels/messages_channel.rb
class MessagesChannel < ApplicationCable::Channel
  def subscribed
    stream_from 'messages'
  end

  def receive(payload)
    message = Message.create(chatroom_id: payload["chatroom_id"], content: payload["message"])
    ActionCable.server.broadcast('messages', {message: message.content, chatroom_id: message.chatroom_id})
  end
end
The MessagesChannel#receive method receives the payload sent by App.messages.send, using it to create and save a new message, and then broadcasting that new message out to all of the subscribing clients. This triggers the received function of all subscription instances to fire, appending the message to the appropriate chatroom's show page.

There are a few drawbacks with our current approach through.
You may have noticed that we're not formatting our messages when they arrive on the page. While we could simply add some HTML elements and styling inside our App.messages.received function, this could become unwieldy. Furthermore, we already have some code that formats individual messages in our app/views/messages/_message.html.erb partial. Repeating the same HTML formatting in our received function wouldn't be very DRY.
Let's solve this problem with the help of Active Jobs and a fancy new Rails 5 feature––Action Controller renderers.
Using Active Job and Action Controller Renderers to Broadcast New Messages
We'll follow the pattern that DHH laid out in his Action Cable screencast. Instead of running the ActionCable.server.broadcast code directly from the messages channel, we'll refactor it into an Active Job that we'll run as an after_create_commit callback on our Message model.
# app/models/message.rb

class Message < ApplicationRecord
  belongs_to :chatroom
  belongs_to :user

  after_create_commit {MessageBroadcastJob.perform_now self}
end
We want to broadcast messages every time they are created, right after they are created. So, the after_create_commit hook is the perfect place to run our broadcast code.
Let's build our that job now.
# app/jobs/message_broadcast_job.rb

class MessageBroadcastJob < ApplicationJob
  queue_as :default

  def perform(message)
    ActionCable.server.broadcast "messages", message: render_message(message)
  end

  private
    def render_message(message)
      ApplicationController.renderer.render(partial: 'messages/message', locals: { message: message })
    end
end
The really cool part of our job is the use of the ActionController.renderer. This is a new Rails 5 feature that allows us to instantiate an Action Controller renderer outside of a controller. This way, we can manually render our message partial, capturing the formatted and styled HTML and broadcasting it to our subscriber to be appended to the page on the client side.
Problems
Okay, Action Cable is configured, our connection and channel have been established, and our subscription is up and running. We should be able to successfully send and receive messages, in real time.
However, we are still working with only one subscription that is responsible to receiving all Message Channel broadcasts. This means that if a user posts a message to chatroom number 1, the received function of our one subscription fires, and must rely solely on jQuery to append the new message to the correct chatroom show page.
Let's take a closer look:
App.messages = App.cable.subscriptions.create('MessagesChannel', {
  received: function(data) {
    $("#messages").removeClass('hidden')
    return $("[data-chatroom='" + data.chatroom_id + "']").append(data.message);
  }
});
Our received function relies on the Messages Channel broadcast having send the new message's chatroom ID through as part of the payload. Then, we use jQuery and data selectors to ensure that we append the new message to the correct chatroom showpage.
This approach violates the single responsibility principle--our one subscription is responsible for handling new messages for every single chatroom. What a nightmare!
Let's implement a refactor in which we create a subscription for each existing chatroom.
Refactoring for Multiple Room Subscriptions
In order to create a subscription for every chatroom, we need to iterate over all of our chatrooms. In order to access all the chatrooms in our JS files, we'll change app/assets/javascripts/channels/messages.js to app/assets/javascripts/channels/messages.js.erb.
$(document).on('turbolinks:load', function() {
  submitNewMessage();
});

<% Chatroom.all.each do |chatroom| %>

  App['room' + <%=chatroom.id%>] = App.cable.subscriptions.create({channel: 'MessagesChannel', room: <%=chatroom.id%>}, {
  received: function(data) {
   $("[data-chatroom='" + this.chatroomId + "']").removeClass('hidden')
    return $("[data-chatroom='" + this.chatroomId + "']").append(data.message);
  },

  setChatroomId: function(chatroomId) {
    this.chatroomId = chatroomId
  }
});
<% end %>

function submitNewMessage(){
  $('textarea#message_content').keydown(function(event) {
    if (event.keyCode == 13) {
        var msg = event.target.value
        var chatroomId = $("[data-chatroom]").data().chatroom
        App['room' + chatroomId].setChatroomId(chatroomId)
        App['room' + chatroomId].send({message: msg})
        $('[data-textarea="message"]').val(" ")
        return false;
     }
  });
}
There are a few important changes to note here.
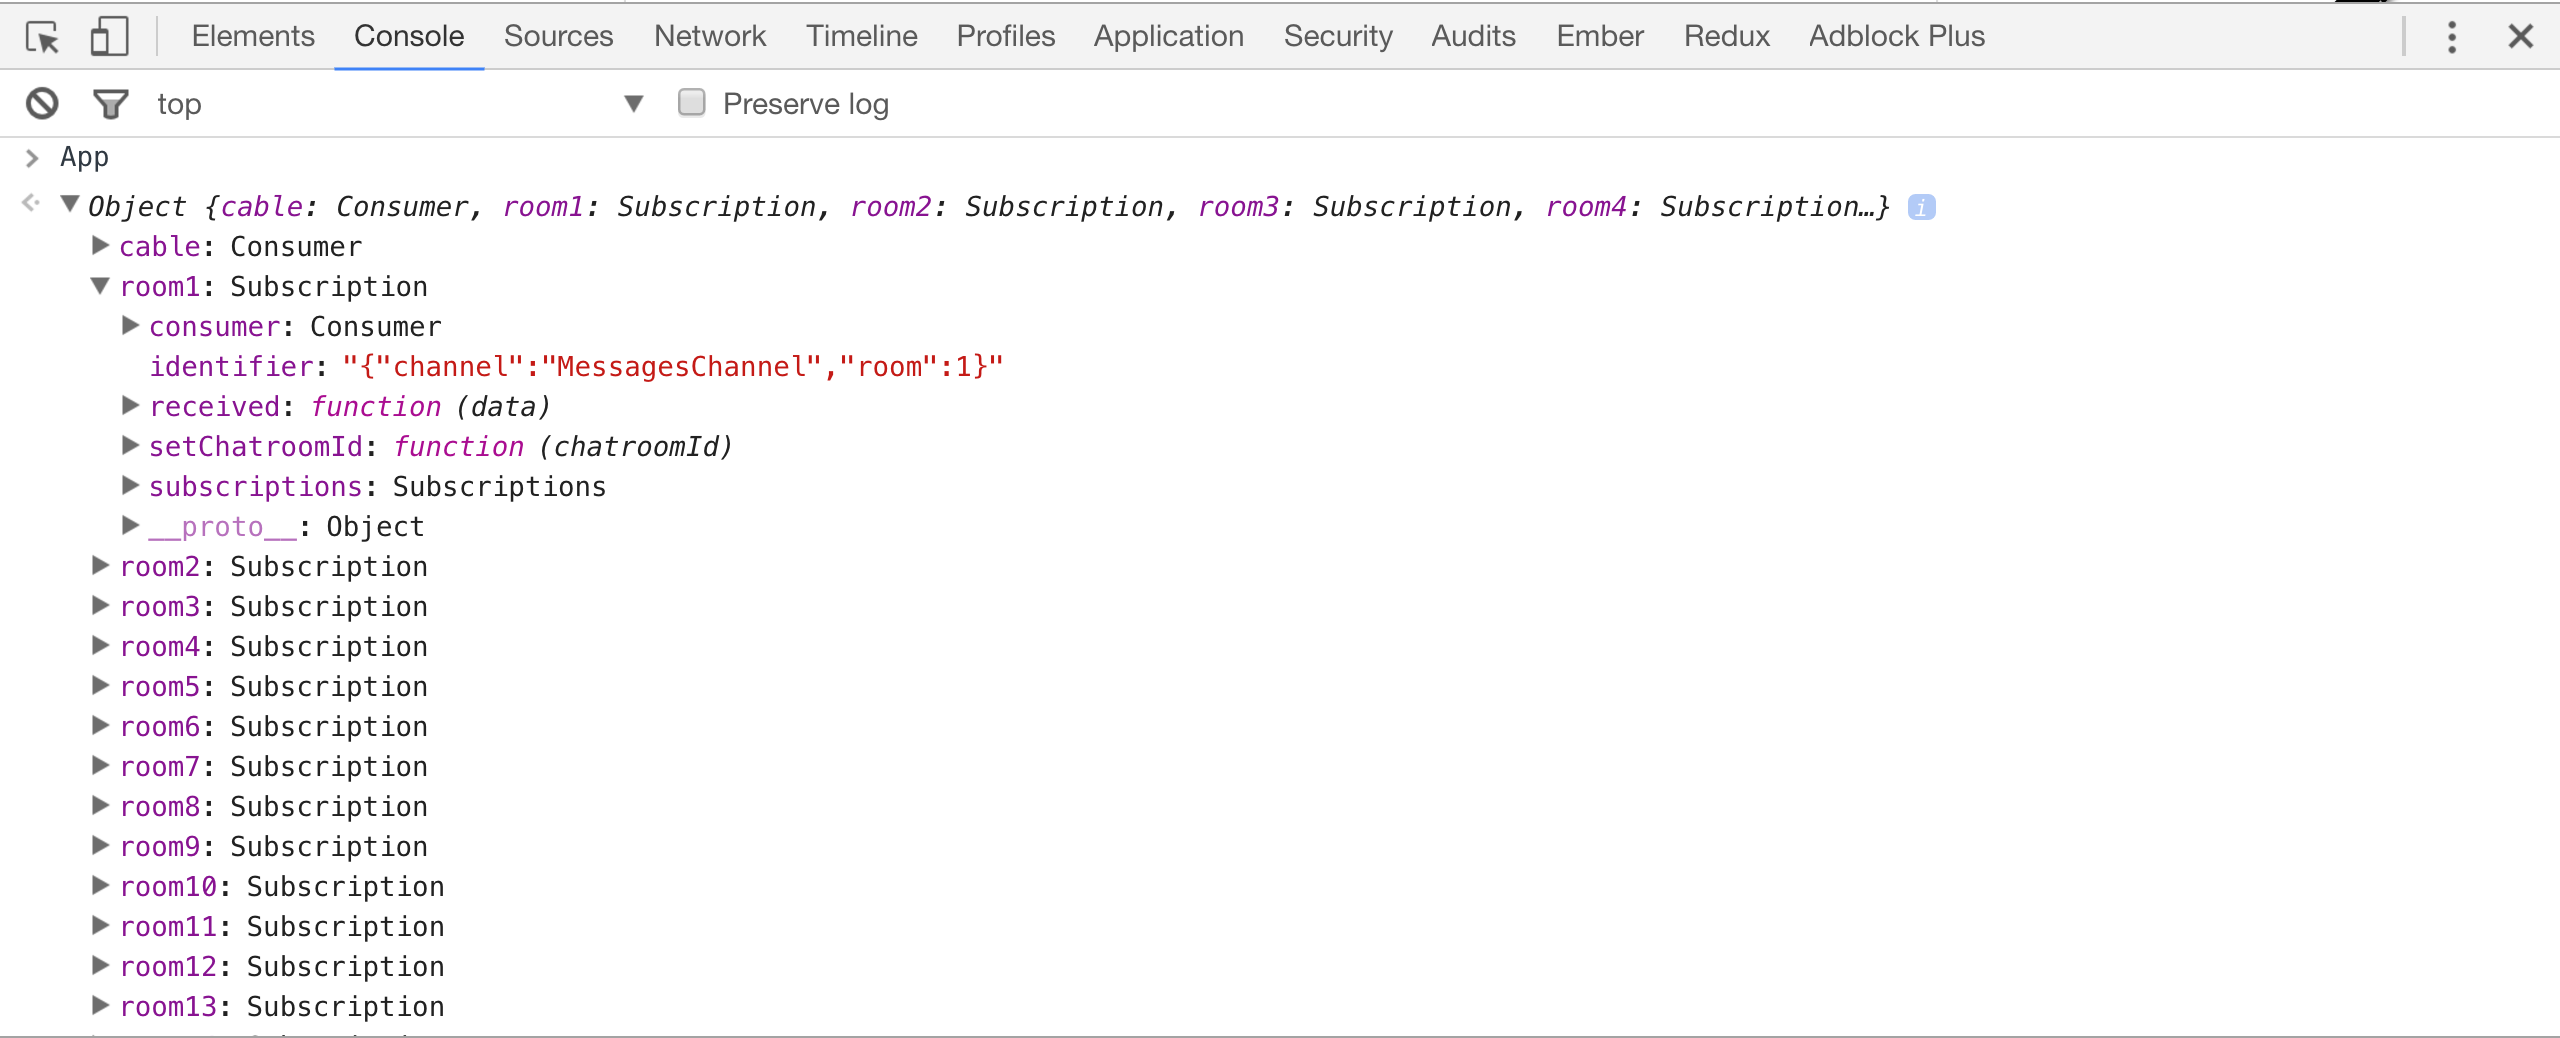
First, instead of creating just one subscription object for our App object, App.messages, we are iterating over all of the chatrooms and creating one subscription object for each chatroom.
Our App object thus has a series of subscription objects, stored under property names of room1, room2, room3 and so on.
Let's take a look in the browser:
Secondly, we made a change to the way in which we instantiate our subscriptions. Instead of:
App.cable.subscriptions.create('MessagesChannel', {
  ...
})
We pass in an object as the first argument, designating the channel name and the room ID, interpolating the chatroom ID for value of room.
App.cable.subscriptions.create({channel: 'MessagesChannel', room: <%=chatroom.id%>}, {
  ...
}
This ensures that the room ID will get passed to our Messages Channel as a parameter. As a result, we no longer have to send the chatroom ID as part of the payload to the MessagesChannel#receive method. We'll take a closer look at this in a moment.
In fact, we no longer have to broadcast the chatroom ID from the Messages Channel to the subscriptions' receive functions either. This is because we added a function to our subscription object, setChatroomId. We call this function in our event listener function, setting the subscription object's chatroomId property to the chatroom ID plucked from the page using jQuery.
Each chatroom show page has the following div:
<div class="panel-body" id="messages" data-chatroom=
  <%=@chatroom.id%>>
  <%= render partial: 'messages/message', collection:
    @chatroom.messages%>
</div>
Therefore, our event listener can use the following line to grab the chatroom ID of the room to which the user is posting the message:
var chatroomId = $("[data-chatroom]").data().chatroom
Once we grab the chatroom ID, we dynamically call the matching subscription object's setChatroomId function:
App['room' + chatroomId].setChatroomId(chatroomId)
This ensures that this same subscription object's receive function can use its own chatroomId property to identify the correct chatroom show page to which to append the new message:
received: function(data) {
   $("[data-chatroom='" + this.chatroomId + "']").removeClass('hidden')
    return $("[data-chatroom='" + this.chatroomId + "']").append(data.message);
  },
Now we're ready to update our Messages Channel and broadcasting code.
First things first, we'll visit the MessagesChannel#receive method. Now that the room ID is being passed via params, our call to Message#create should look like this:
def receive(payload)
    Message.create(user: current_user, chatroom_id: params["room"], content: payload["message"])
  end
To recap, because we created our client-side subscription with a first argument of {channel: "Messages Channel", room: <room ID>}, the Messages Channel has params that look like this:
{"channel"=>"MessagesChannel", "room"=>1}
So, we'll use the room key of params, which points to the ID of the room from which the new message was sent, to associate our new message to its room.
Lastly, we want to ensure the the receive function of only the correct room's subscription object is invoked when we broadcast to the Messages Channel. We can do this with two minor changes.
First, we'll update our MessagesChannel#subscribed method to dynamically stream from each specific room broadcast:
# app/channels/messages_channel.rb

...

 def subscribed
    stream_from "room-#{params['room']}:messages"
 end
Note that we are able to access the room ID from params.
Then, we make sure that our broadcast code, being run from the MessageBroadcastJob is dynamically broadcasting to the correct room stream:
# app/jobs/message_broadcast_job.rb

...

def perform(message)
    ActionCable.server.broadcast "room-#{message.chatroom_id}:messages", message: render_message(message)
  end
And that's it!
Conclusion
As Rails 5 gains more traction, and more and more developers are using it in production, we're seeing more robust resources on some of its new features. This post was made possible by the growth of Action Cable discussion in the community, and I would consequently appreciate any and all comments/suggestions/corrections/questions below :)