Continuous Integration (CI) is a development practice in which developers working on the same code base will integrate the code they've written into that shared repository. In other words, CI is the simple act of opening a pull request on a repo that you're collaborating on. The code you've written on your branch is then tested automatically, and the status of that test will show up on GitHub in the pull request view so that whoever is merging your PR will know if your code contains any errors.
This is a common workflow that many of us are familiar with. We may be less familiar, however, with how those automatic tests of the code in your PR are actually enacted.
There are a number of continuous integration platforms - Travis and Janky, to name a few. In this post however, we'll be building our own CI server and connecting it to a shared repo via GitHub's webhooks.
In this post, we will:
- Create a simple Rails application that will act as our CI server.
- Set up and use ngrok to connect our localhost to the real internet so that we can test our webhook.
- Set up a webhook into a GitHub repository that listens for the opening, updating and closing of a pull request.
- Use the GitHub Status API along with it's Octokit.rb wrapper to send status reports back to Github.
The purposes of our remote validations are a little different than the remote builds you may be familiar with. Our remote validations will serve a very specific purpose - instead of running a test suite, our validations will be checking the directory from which the pull request originates for the presence of certain files, such a license file.
CI Flow
Let's run through the basic flow of our application before we start coding. For the purposes of this example, our fictional coders are Clara and The Doctor, who are working to apply some updated code to the code base of the Tardis.

- Clara clones down the repo for the Tardis program onto her computer. She creates a new branch, writes some code and pushes up her changes. She then opens a pull request onto the master branch of the repo.
- Our CI server (a Rails app) is listening for this pull request. As soon as the pull request is opened, a bunch of data regarding the request gets sent to our Rails application.
- Our application uses this information to run some checks on the code in Clara's pull request. Once those checks are complete, we will...
- Send a response of "passed checks" or "failed checks" back to GitHub, to be displayed right where the open PR visuals are located.
- The Doctor will merge Clara's PR if he sees that the code in it passed our checks.
Writing Our CI Application
We'll be using a simple Rails app to hook into GitHub by listening for pull requests, running checks on the code in that PR and sending the results of those checks back to GitHub. Let's get started.
Creating the Rails App
Generate a new rails app with the rails new <app name> command in your terminal. We'll call our app testing-ci.
Models
This application will rely on one model, the Pull Request model, to wrap the information that GitHub will send to us when someone opens a pull request. We'll take that data, create a new Pull Request object, run our own checks on that pull request, and send some data back to GitHub based on the outcome of those checks.
We're going to come back to building out this model in a bit. Before we can determine exactly what properties it should have, we need to learn what kind of data GitHub sends to our app when a pull request is open and what kind of data we need to send back to GitHub via the GitHub Status API.
Routes and Webhooks
What is a webhook? A webhook is essentially a callback action. GitHub has a number of events that we can hook into. Once we add a webhook to any pull request events on a particular GitHub repository, GitHub will help us out by sending a ton of data regarding that pull request to whatever URL we provide GitHub with when we set up our webhook.
So, we need to create a route in our Rails application that we can tell GitHub to send this data to. We'll call our route event_handler, and it will receive a POST request from GitHub, full of data about a pull request.
Open up config/routes.rb and add the following line:
# config/routes.rb
post 'event_handler' => 'pull_requests#event_handler'
We'll create a corresponding Pull Request Controller to contain this action:
# app/controllers/pull_request_controller.rb
class PullRequestsController < ApplicationController

   def event_handler
      #some more code coming soon!
   end
end
Okay, so we've set up our Rails app to contain a route that is ready to receive POST requests from GitHub, containing data about a pull request.
Now let's add a webhook to our GitHub repository and tell GitHub to send a payload of data to the event_handler action of our Rails app.
Creating the Webhook
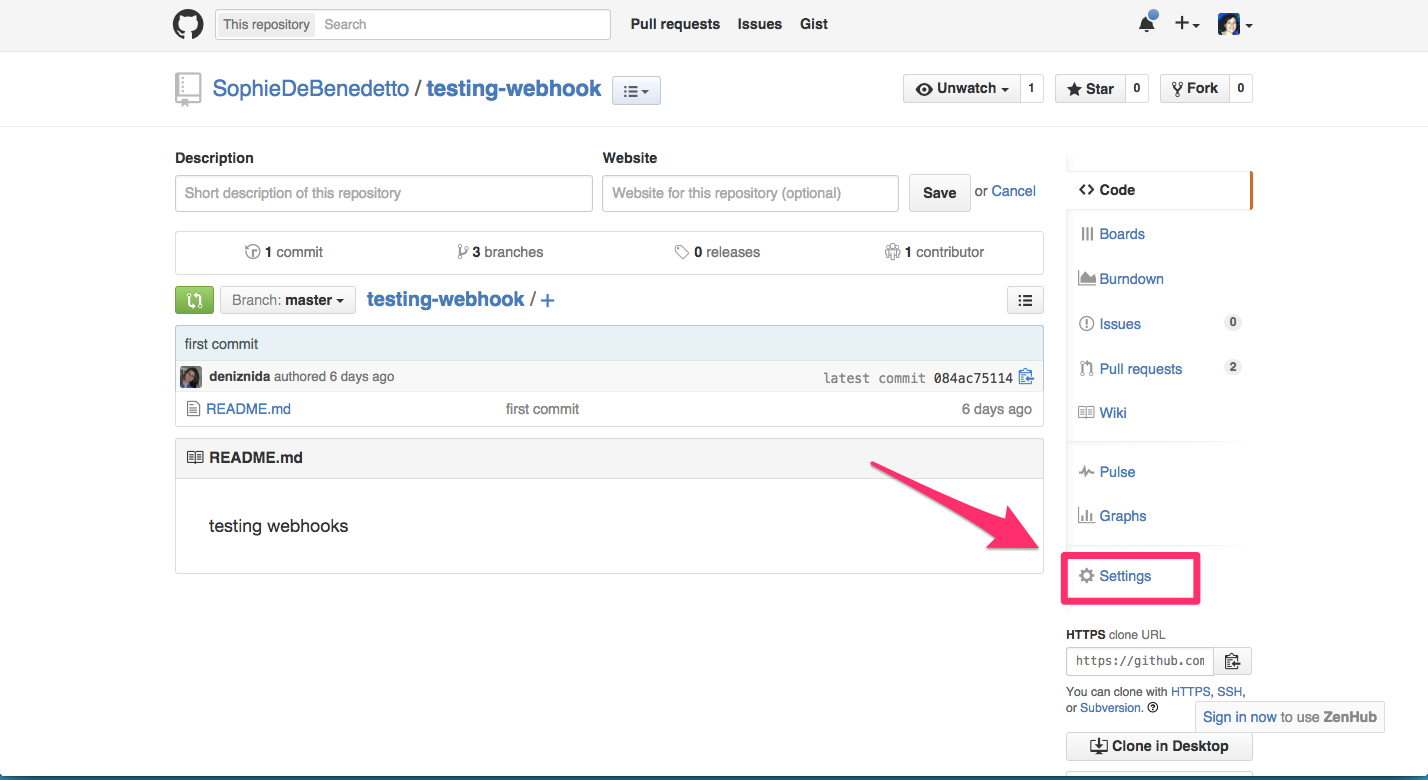
In your browser, navigate to the GitHub repository that you want to add continuous integration to.
Click the "settings" link on the right:
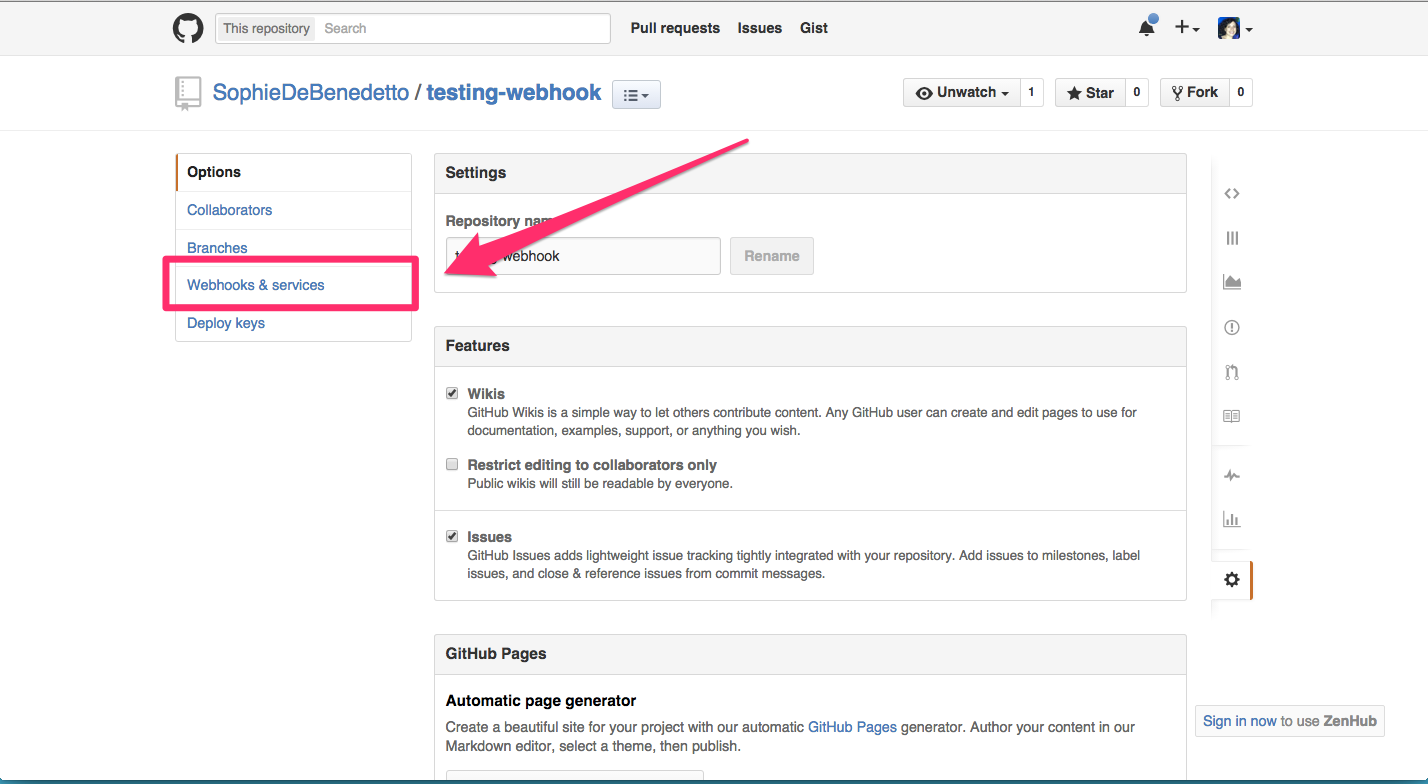
Click the "webhooks and services" link on the right:
Click "add webhook" on the top right:
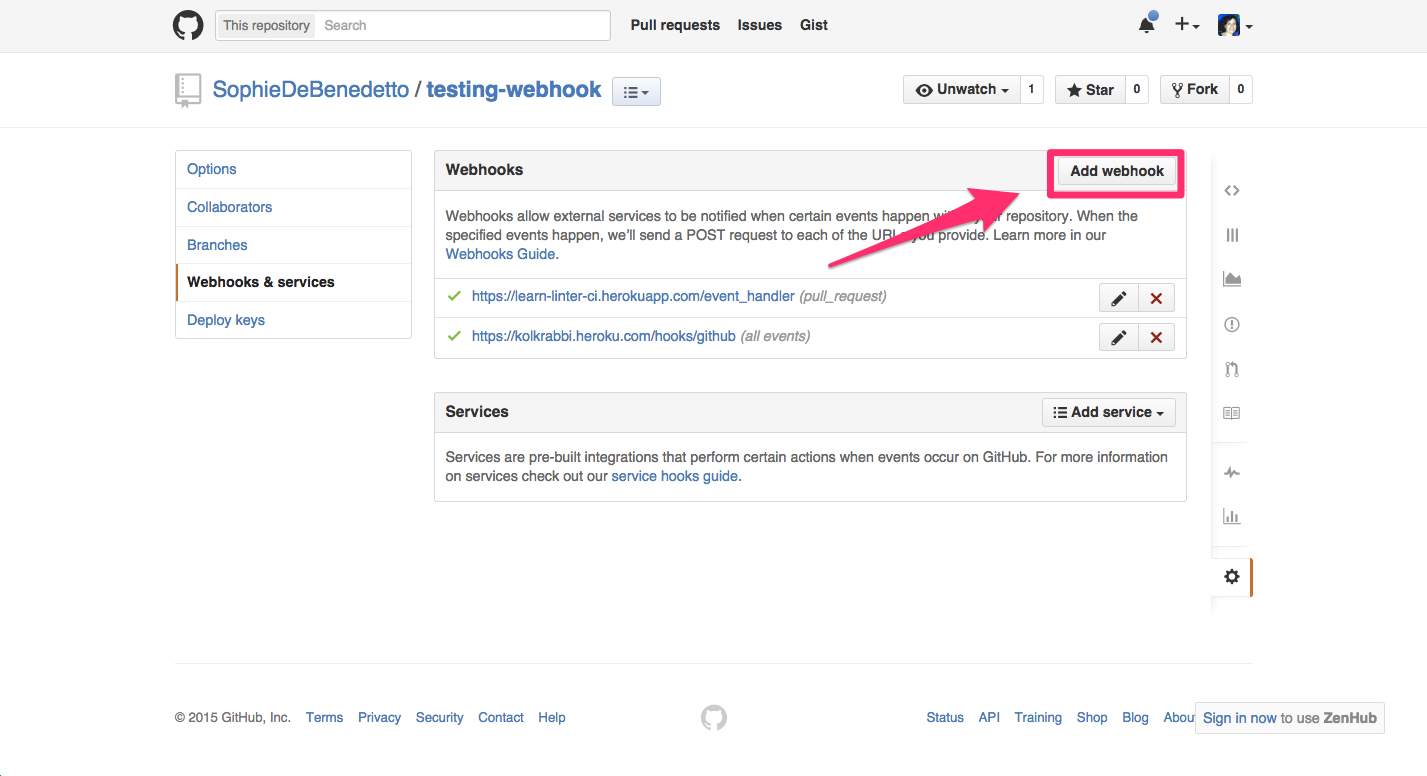
You'll be prompted to input your GitHub password, then you'll be taken to a page where you can input the payload URL, the URL to which you want GitHub to POST all the data regarding a pull request that gets opened on the repo.
Uh-oh, we do have a route event_handler in our application, but our application isn't deployed yet––we're not even done building it! Currently, we can only run it on localhost. GitHub can't send a payload to an application running on localhost––such an app isn't connected to the real internet. What can we do to get around this, and connect GitHub webhooks to an application that is still in development?
We can use ngrok.
Using ngrok
ngrok will expose your localhost to the real live internet by creating a secure public URL that connects to a server running on a specific port on your computer.
Then, if you tell someone (or something - say for example a GitHub webhook) to visit the public URL that ngrok generates for you, it will connect that client to whatever application you have up and running on your localhost.
Let's do it!
- Download ngrok here. Unzip the application by navigating to your home directory,
cd ~, and executingunzip /path/to/ngrok.zip. - Open another terminal window and navigate to the directory of your Testing-CI Rails app. Start up the server with
rails s. Go tolocalhost:3000and you should see the Ruby on Rails welcome message. - Go back to the terminal window in which you unzipped ngrok and start up the ngrok tunnel. The "tunnel" refers to the connection that ngrok will create for you between your localhost and the outside world, i.e. the internet. Start up the tunnel via
./ngrok http 3000. You should see something that looks like this:
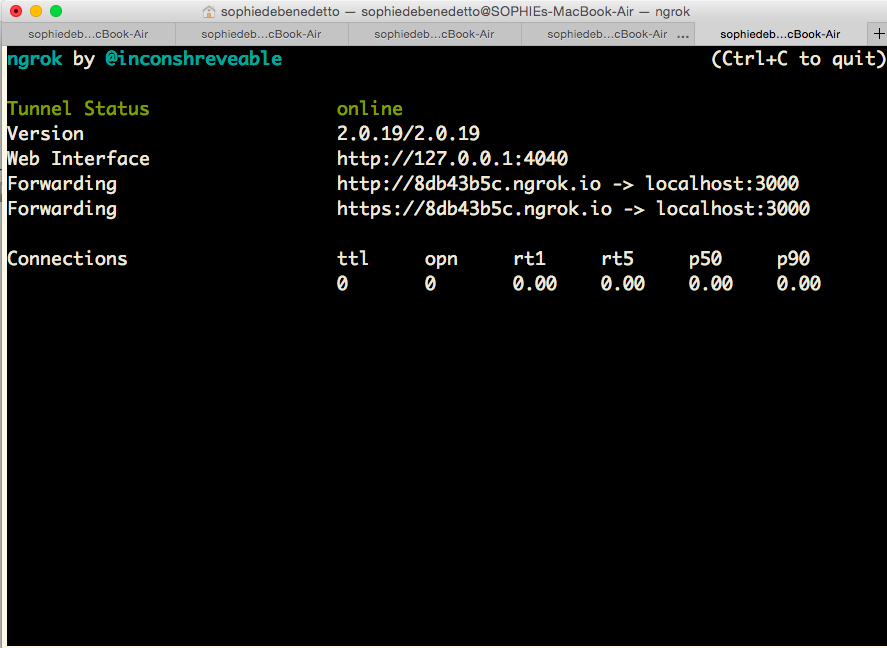
We did it! The secure, public URL ngrok has generated for us, that connects to whatever application is running on localhost 3000 can be found here:
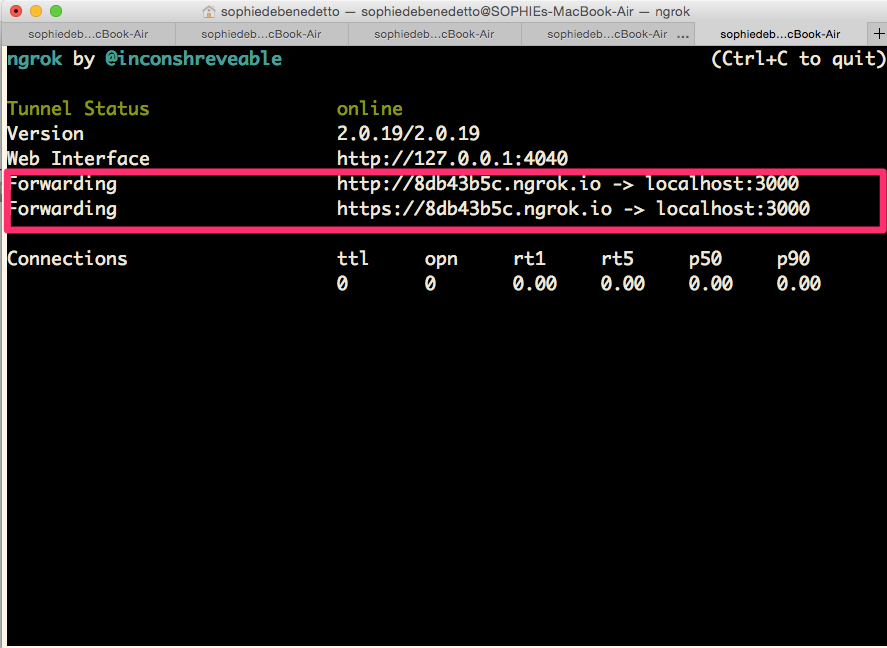
If you visit https://8db43b5c.ngrok.io (or whatever random URL ngrok generates for you - it will be different than this one), you'll see the Ruby on Rails welcome message being displayed by our Testing CI Rails app.
Now that we have a public URL that connects to the application running on our localhost, we can finish creating our webhook.
Finishing Our Webhook
Now we can fill out the "Payload URL" field in the add-a-new-webhook form on GitHub. Fill it with: https://whatevernumbersngrokgivesyou.ngrok.io/event_handler.
Scroll down on that page and under the "Which events would you like to trigger this webhook?" area, click "let me select individual events". Select only "Pull Request" from the available list.
Inspecting Your Web Traffic
Now in order to operate on the payload, or the hash of data that GitHub will send to our Rails app when someone opens a pull request, we need to know what that payload looks like.
Lucky for us, ngrok provides a real-time web UI where we can view all of the HTTP traffic coming through our tunnels. Visit http://localhost:4040 in your browser and you should see:
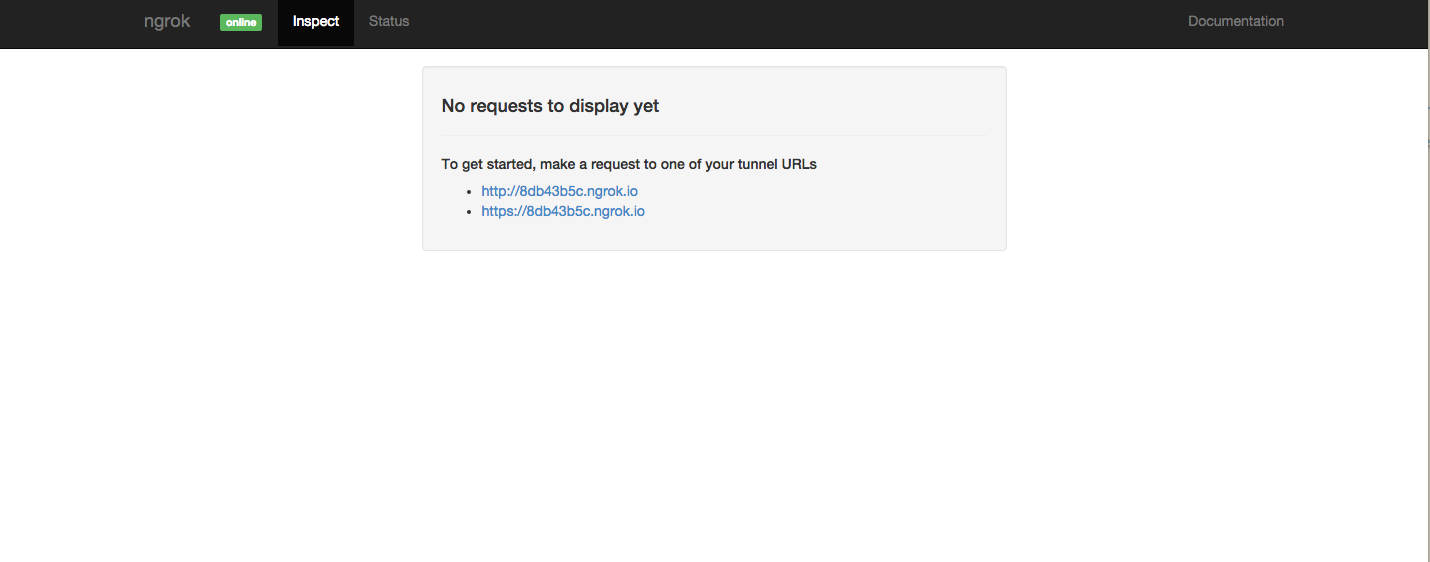
Hmm, looks like there are no requests to inspect yet. That's because we haven't opened any pull requests on the repo that contains our new webhook, nor have we told GitHub to do something like send a test payload to our app yet. Let's try that out right now.
Testing Our Webhook: Responding to the Ping Event
GitHub is actually going to help us with this. Unbeknownst to us, GitHub sent a payload with some test data to the event_handler route of our Rails app as soon as we hit that green "add webhook" button. If we scroll down on the page where we are managing our GitHub webhook, we'll see something like this:
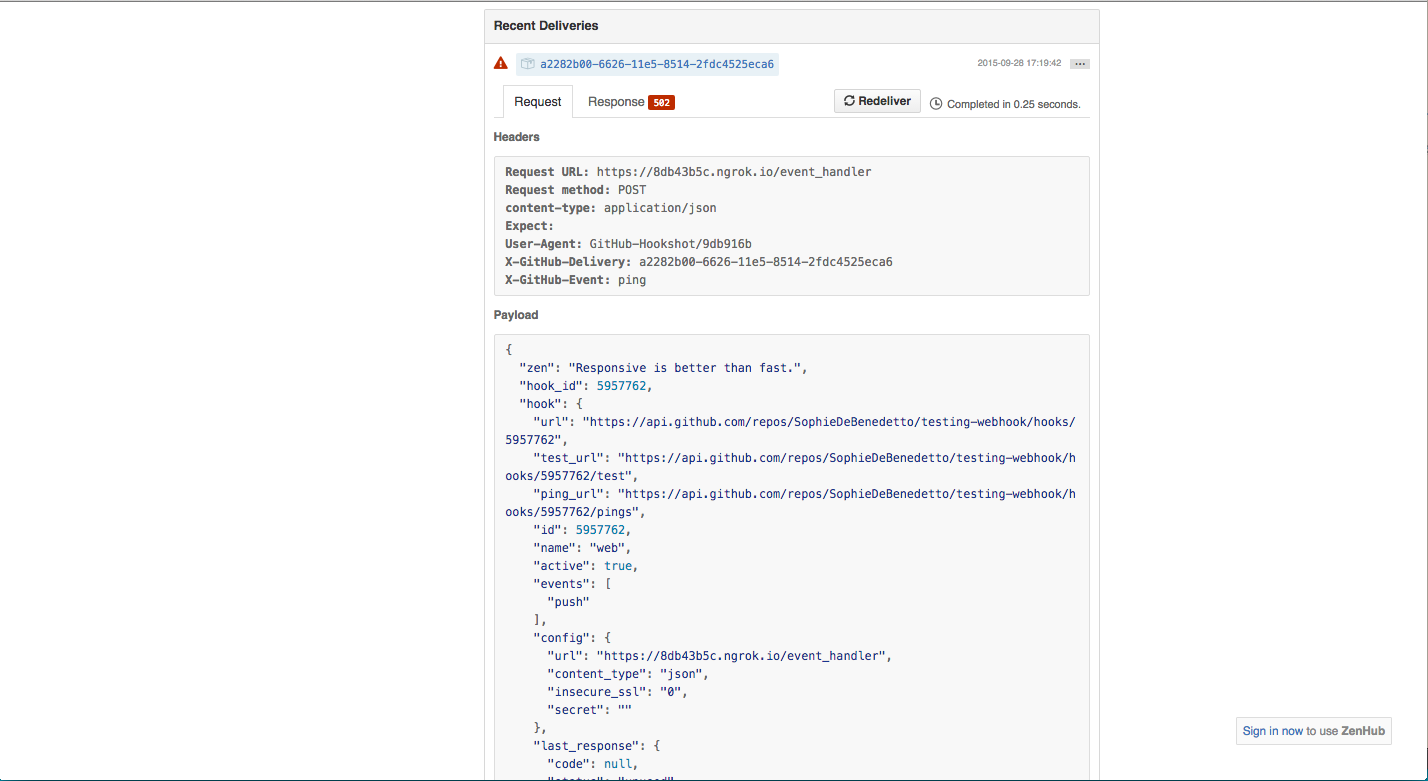
Here we can see the content of the payload that GitHub sent to our app to test out the webhook. We told our webhook to send a payload to our app when a pull request is opened. However, when you first set up a webhook, GitHub will send this "ping" event payload to your app, just to test it out.
Notice that we have a scary red exclamation point next to the report on this payload. That's not good. That means that our application isn't responding correctly to the ping event. This is because we didn't write any code in the event_handler action of our Pull Request Controller. So at this moment our app does not respond when GitHub sends a payload. Let's tell our app how to respond to the ping event so that GitHub knows our app is up and running.
Responding to GitHub's Ping Event
Inside your event_handler action of the Pull Requests Controller, we'll place a binding.pry. Now, on GitHub, on the page where we've been managing our webhook, let's click the "redeliver" button.
Hop on over to your terminal and you should be stuck in your binding. GitHub successfully posted a payload to our app! Let's take a look at that payload.
Type params into your terminal and you'll see the payload content. It's the same content displayed in the GitHub webhook management page and it's the same content you'll see ngrok displaying for us if you visit localhost:4040.
Note that this ping event is different than the pull request events we are building our app to listen to. Again, the ping event is only being sent by GitHub to establish that our webhook is working. GitHub is expecting us to send back a 204 response. The 204 status code means server has fulfilled the request but does not need to return any content in the response body.
So, let's tell our event_handler action to return a response to GitHub without any content in the body:
def event_handler
  head :no_content
  return
end
Now, go back to GitHub, to our webhook management page and click the "resend" button. We should now see that green checkmark that tells us our app received the ping event payload and send back the correct response.
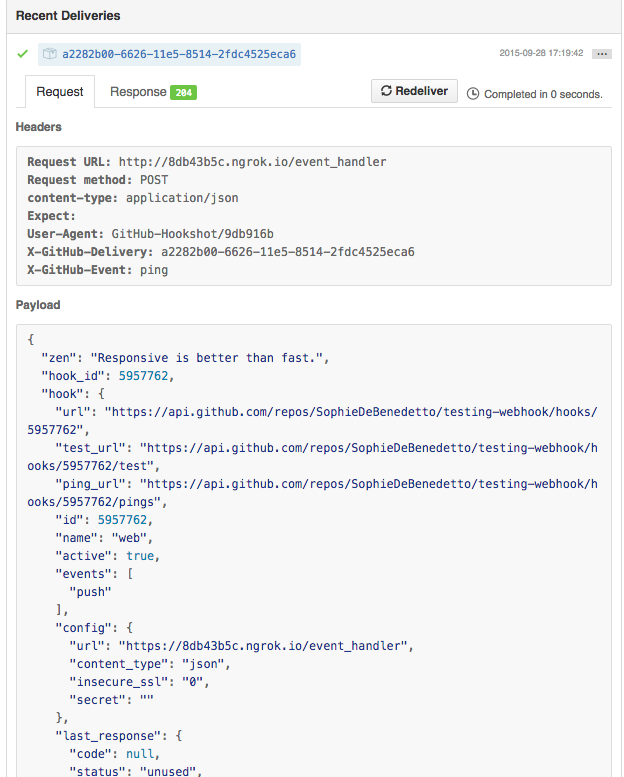
Our webhook is up and running!
However, we need to make sure our #event_handler method is coded to properly respond to any and all first "ping" events from Github. After all, any time we add this webhook to a given repo, this "first time ping event" will be triggered.
Note that this particular even will always send params that have a key of "zen". So, our #event_handler method should be set up like this:
# app/controllers/pull_requests_controller.rb

def event_handler
  if params["zen"]
    head :no_content
    return
  else
    # do the actual PR validating
    head :no_content
    return
  end
end
Now, let's write the code that does the "actual PR validating".
Coding our Pull Request Validator
Now that our webhook is working properly, we can receive a pull request payload from GitHub, write the code to test or validate the code in that pull request and send a response with information regarding those validations back to GitHub, via the Status API.
Step 1: Parsing the Pull Request Payload
Let's open a pull request onto our webhook-ed repo, receive the payload and take a look at it's contents. Checkout a new branch in your repo, make some minor changes, push up and open a PR on the master branch.
This should trigger another payload. We can see it's contents in the ngrok GUI at localhost:4040, or, since we have a binding.pry in our event_handler action, we can go into our terminal and type params.
If you visit ngrok at localhost:4040, you should see something like this:
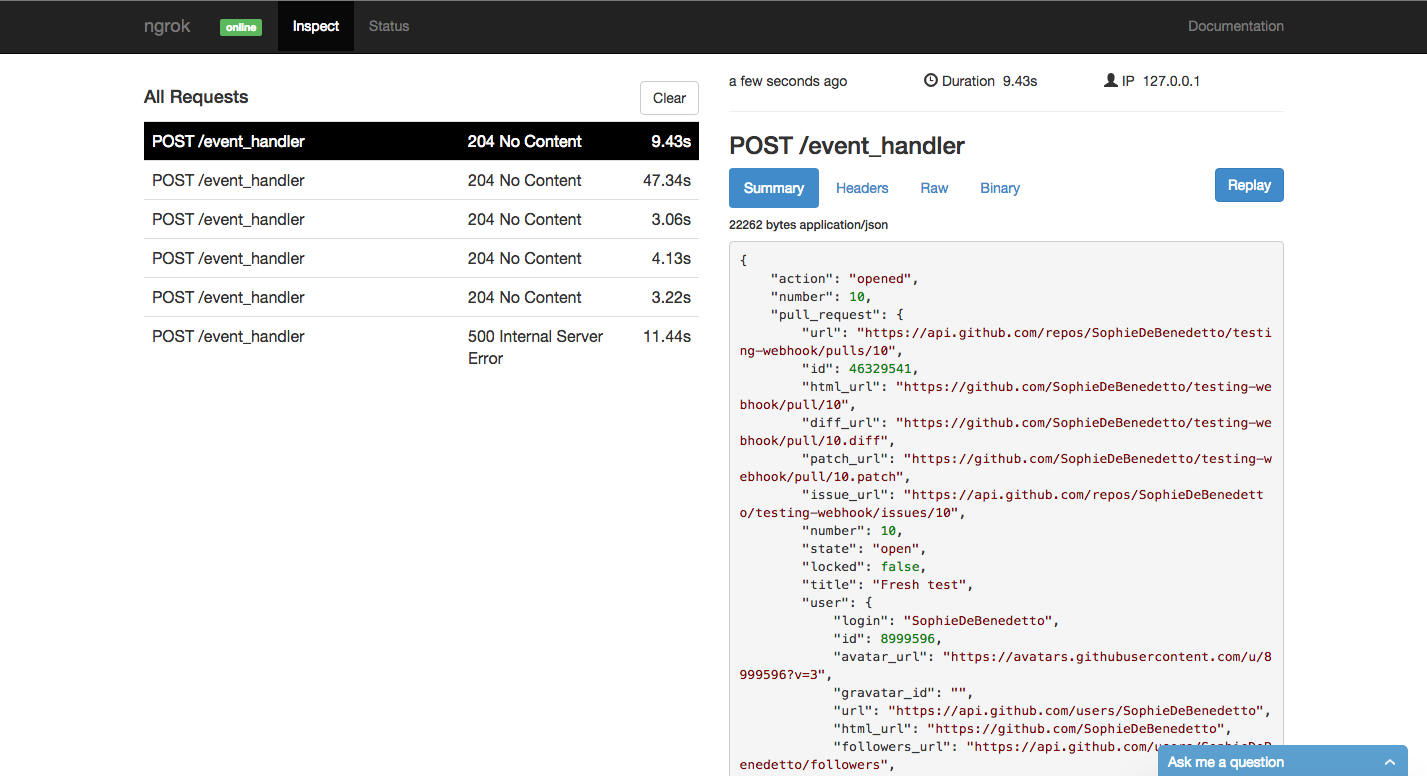
We can see that our hash has a key of "action" with a status of "opened". We can also scroll down and explore the other information available to us. We can see the repo name, the user that the repo belongs to, the user that made the PR request, and more.
Exactly how you test the code in the repo will depend entirely on your needs. You may want to pull down the repo, checkout the branch from which the pull request is originating and run a test suite. You may be running some other kind of test or validation. The purpose of my continuous integration effort is to check for the presence and content of certain files. I won't be running tests on the code in those files.
In order to check the presence and content of these files, we need to clone down the webhook-ed repo, store it temporarily in our Rails application, run some code that lints that directory and returns to us some kind of status report. The nitty gritty code of checking the directory we clone down won't be discussed here. We'll focus on cloning the repo on which the pull request was opened, switching to the branch in question and creating a status report regarding that branch to send back to GitHub.
In order to run git clone and git checkout commands from our Rails application, we'll need to identify the clonable link to the repo and the branch name. All of this information is contained in our payload.
Getting The PR Attributes
Our clone url can be found in our payload here:
params["pull_request"]["head"]["clone-url"]
And our branch name can be found here:
params["pull_request"]["head"]["ref"]
We'll need to give our pull request a status to send back to the GitHub Status API. In order to send such a message, the Github Status API requires certain information regarding a PR and a repo. To meet these requirements, we will need to code our PullRequest model to have the following attributes to describe a PR:
clone_urlbranch_namestatusrepo_namesha
Let's do it!
Step 2: Coding the Pull Request Model
For this purposes of this application, I won't be creating a pull requests table and persisting PR data, however you certainly could if it meets your needs. Instead, I'll simply define PullRequest model to have the attributes I need:
class PullRequest

  attr_accessor :branch_name, :clone_url, :repo_name, :status

  def initialize(params)
    payload = params["pull_request"]
    @sha = payload['head']['sha']
    @branch_name = payload["head"]["ref"]
    @repo_name = payload["head"]["repo"]["full_name"]
    @clone_url = "http://www.github.com/#{repo_name}.git"
    @status = "pending
  end
end
Now, back in the event_handler action of the PullRequestsController, we can create a new pull request object like this:
# app/controllers/pull_request_controller.rb

def event_handler
  if params["zen"]
    head :no_content
    return
  else
    @pull_request = PullRequest.create(params)
  end
end
Note that we've coded our PullRequst model such that the set the initial #status attribute is set equal to "pending". That's because we need to send a pending status back to GitHub as soon as we receive our payload. That gives us time to validate the repo and send the final report back to GitHub once we're finished.
Step 3: Sending a "Pending" Status Back to GitHub
It may take a few seconds for us to validate the content of the repo on which someone has opened a pull request. Let's send an immediate response to GitHub, letting it be known that the checks are pending.
The GitHub Status API
The GitHub Status API is the interface through which our program can communicate with GitHub. There is a Ruby wrapper for this API, Octokit.rb, that we'll be using to facilitate this interaction.
First, visit your GitHub profile and click the "settings" icon. Then, click the option on the left hand menu to get your personal API token. We'll be needing that token to configure the Octokit client and interface with the API.
Now we're ready to configure our client. Let's write a method in our Pull Request Controller to take care of that:
def configure_client
      @client ||= Octokit::Client.new(:access_token =>
        ENV['octo_token'])
end
I chose to set this as a callback method that will run before the event_handler method is invoked:
class PullRequestsController < ApplicationController
  before_action :configure_client, only: [:event_handler]

  ...
end
To send a status regarding our pull request back to GitHub, we can use the #create_status method provided to us by Octokit.rb. This method will send a POST request back to GitHub with the necessary information regarding our open PR.
@client.create_status(@pull_request.repo_name,
  @pull_request.sha, @pull_request.status)
The #create_status method takes in an argument of the repo name, PR sha and the status of the pull request.
Note: The Status API supports three statuses only: "pending", "success" and "failure".
Let's add this new line of code to our event_handler action:
class PullRequestsController < ApplicationController
  before_action :configure_client, only: [:event_handler]

  def event_handler
    if params["zen"]
      head :no_content
      return
    else
      @pull_request = PullRequest.create(params)
 @client.create_status(@pull_request.repo_name,
     @pull_request.sha, @pull_request.status)
      head :no_content
      return
    end
  end
end
Great. Now we're ready to validate the code in the PR and send the final report back to GitHub.
Step 4: Validating The Pull Request
In order to check the directory for files such as a license file, our Rails app needs to clone down the repo.
Let's write a helper method in our Pull Request Controller to handle that:
# app/controllers/pull_requests_controller.rb

def add_repo
  Dir.chdir(File.join(Rails.root, 'tmp'))
  FileUtils.mkdir('pr_repo')
  Dir.chdir(File.join(Rails.root, 'tmp', 'pr_repo'))
  system "git init"
  system "git clone #{@pull_request.clone_url}"
  Dir.chdir(File.join(Rails.root, 'tmp', 'pr_repo'))
  system "git fetch"
  system "git checkout #{@pull_request.branch_name}"
end
Here we are navigating to the tmp directory of our application and creating a new, temporary, subdirectory in which to store the cloned repo, app/tmp/pr_repo. Then, we use some system commands to clone the repo in question and checkout the branch from which our open PR originated. Now, the cloned repo can be found in app/tmp/pr_repo/<name of the repo we cloned>.
Let's use our helper method inside of the event_handler method to set the directory we will be validating:
class PullRequestsController < ApplicationController
  before_action :configure_client, only: [:event_handler]

  def event_handler
    if params["zen"
      head :no_content
      return
    else
      @pull_request = PullRequest.create(params)
 @client.create_status(@pull_request.repo_name,
     @pull_request.sha, @pull_request.status)
      add_repo
      @pull_request.status = validate_repo
    end
  end
end
Notice we are using a validate_repo method to change the status of our pull request object. This method comes to us from a gem that was written for this particular project for the purpose of checking directories for certain required files. We don't have to worry about that here.
Okay, we added the directory of the repository that needed validating, we checked out the relevant branch and then validated that repo with the #lint_repo method. Our pull request's status has been updated and we're ready to send the final results back to GitHub.
Step 5: Sending the Final Report to GitHub
We can use the same #create_status method as earlier:
class PullRequestsController < ApplicationController
  before_action :configure_client, only: [:event_handler]

  def event_handler
    if params["zen"
      head :no_content
      return
    else
      @pull_request = PullRequest.create(params)
 @client.create_status(@pull_request.repo_name,
     @pull_request.sha, @pull_request.status)
      add_repo
      @pull_request.status = validate_repo
 @client.create_status(@pull_request.repo_name,
     @pull_request.sha, @pull_request.status)
    end
  end
end
And that's it! For an added bonus, read on to learn how to send additional error messages and even links to external web pages back to GitHub through the Status API.
Bonus: The Status API and the info Hash
It's possible to send additional information regarding our pull request back to GitHub. We can do so through the info hash that Octokit.rb's #create_status method takes in as an optional final argument.
The info hash contains the following keys:
:context:description:target_url
In order to explain what these keys do for us, let's take a look at the final UI provided by GitHub upon receiving a POST request from the #create_status method that includes an info hash:
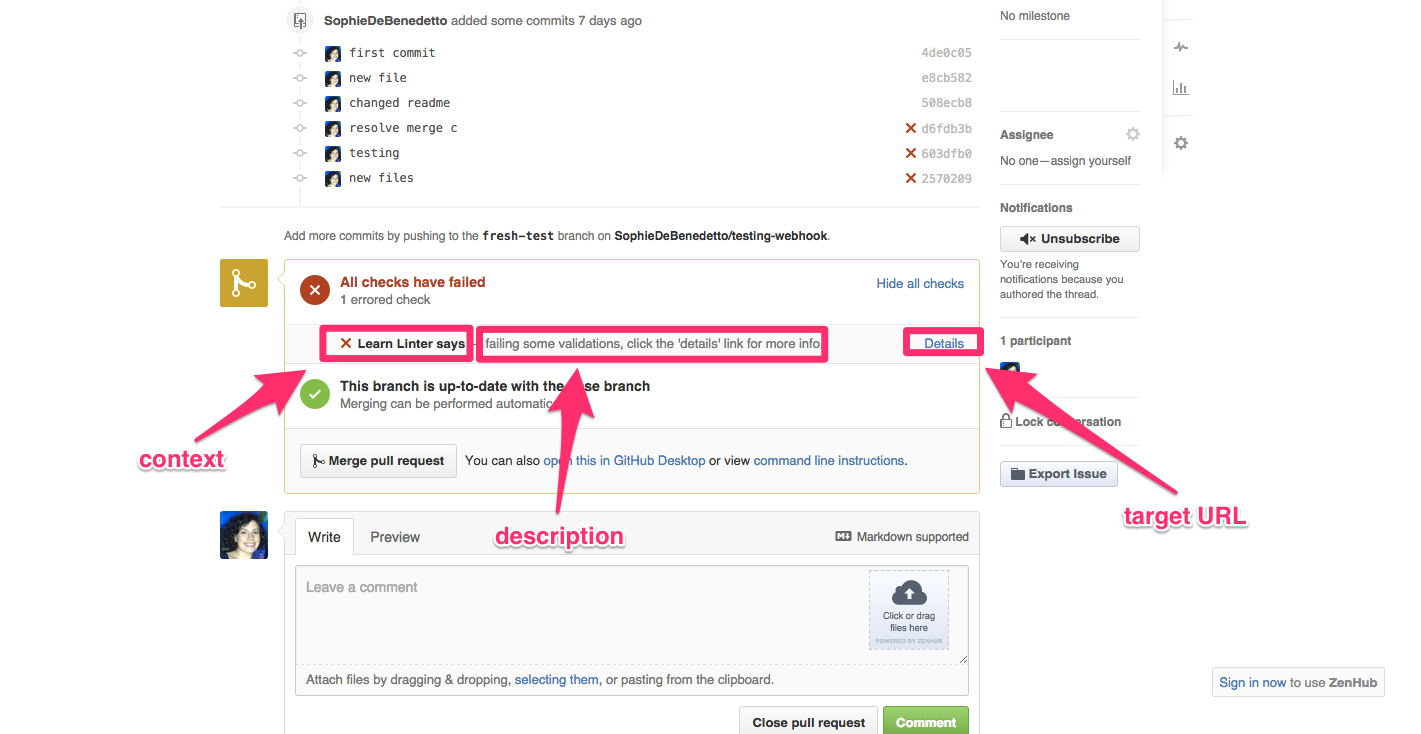
If we want to provide really detailed information regarding the pull request and its validation, we can even establish a route for a pull request show page and pass the link to that page into our info hash as the value of the :target_url key.
Conclusion
While this post walked through a solution to a very particular validation problem, the basic flow of setting up a webhook and writing an application that receives a payload from that hook, validates the content of that payload and sends a response back to GitHub is very common.
A few tools here - like ngrok and Octokit.rb - will be helpful in any such situation.