This is the first in a series of three posts that will demonstrate implementation of three common Rails design patterns: the adapter pattern; service objects; the decorator pattern
You can find the code for these posts here You can find a demo of the app, deployed to Heroku, here.
As a relative n00b, I'm only just transitioning out of the "make it work" phase of Kent Beck's famous "make it work, make it right, make it fast" directive. Recently having entered the "make it right" phase of my personal growth, I'm finally able to grasp and apply some of the common design principles and patterns of object-oriented programming in general and Rails in particular.
When I first began learning to program, as a student at the Flatiron School, I started reading Sandi Metz's Practical Object-Oriented Design in Ruby. While I could conceptually understand many of the principles outlined there (which is the genius of Sandi Metz––making her work sensical and approachable to even the n00est n00b), I only recently have been able to put them into practice in a way that seemed cogent to me.
Now, having developed a number of applications, I've had a chance (thanks to the guidance of teachers and coworkers) to implement and begin to understand three common Rails design patterns: the adapter pattern, service objects, and the decorator pattern.
I wanted to share my understanding here, in the hopes that other beginners may glean some insight as well.
For the purposes of this series, I built a simple Rails app that offers us a number of opportunities to refactor and apply the above principles.
Before we jump into the code though, I want to share some thoughts on the beginners approach to refactoring.
Why Do We Hesitate to Refactor?
As a beginner, refactoring can be an very intimidating prospect. Even when faced with a mountain of disorganized code, we hesitate.
What's it like to look back on a completed, functioning Rails app that's jam-packed with terrible code?
To borrow a quote from Uncle Bob's discussion of "code hoarders"
Do you wander through dark passageways of floor to ceiling cruft as you attempt to add some new feature or fix some old bug? Do the towers of junk wiggle and wobble and threaten to fall and block your path? Are there whole rooms of code that you dare not visit? Is the structure of the system invisible and buried under piles of new features and dead code?
–– Uncle Bob, Code Hoarders
Even though we may recognize this feeling, we still don't want to refactor.
Why?
Well, to borrow another quote, this time from Dr. Suess by way of Uncle Bob:
This mess is so big, And so deep and so tall, We cannot pick it up. There is no way at all!"
We don't know where to begin. Given a hoard of code, we have no principles to guide our re-organization, or we are not familiar with or confident in our understanding of those principles.
Secondly, we have a working program and we don't want to break it. Our code seems fragile to us. "But I finally got it working!", we might say of a particularly intricate and obscenely long controller action, "If I change it now, everything could break."
Lastly, we may feel a sense of futility regarding code design. "I know my application will grow and change", we might say, "so how can I design an organizational system? I will just have to change it sooner or later anyway."
So, how can we overcome these objections and design a beautiful, well-organized code base?
Don't Be a Code Hoarder, or, Flexible Code is Beautiful Code
Changeability is the only design metric that matters; code that's easy to change is well-designed
–– Sandi Metz, POODR
We can build programs that are well-designed and that accommodate future change. By following the principles of object-oriented design and by implementing common Rails design patterns.
And, we can break our code! That's what tests are for. As long as we have a robust set of tests in place, we don't have to fear making even major changes. Our tests are there to catch us and reveal any broken bits of functionality that those changes may engender.
Let's refresh our memory as to some of those OO design principles.
Object-Oriented Design Principles
The Single Responsibility Principle
According to this principle, one class (or one module) should have one job. According to Sandi Metz, "a class should do the smallest possible thing". This makes our classes reusable, and "applications that are easy to change consist of classes that are easy to reuse".
The Separation of Concerns
In other words, divide your application up into discrete sections, each of which is responsible for a specific “concern”.
What's a "concern"? Think of a concern as an area of responsibility in your application. We already know about a few concerns within the MVC architecture. Views are separate from controllers which are separate from models, and each have their own jobs to do.
We’ve likely seen some additional concerns such as sending emails and text messages and requesting data from an external API.
We'll keep these principles in mind, along with DRY and the Law of Demeter, as we implement our Rails design patterns.
Let's get started!
App Background
For this series, I built a simple Rails application that offers some strong code smells and refactoring opportunities. The app is called Issue Trackr.
The domain model is simple. A user has many repositories, and a repository has many issues.
A user can log in via GitHub and add the link to any of the GitHub repos of which they are the owner. Once added, the app will pull in any existing issue on the repo, and add a webhook to the repository so that new issues or changes to existing issues populate in the app. The app also sends users emails and text message notifications any time one of their issues has changed, or a new issue is opened on one of their repos.
You can check out the code, pre-refactor, here.
The Adapter Pattern
An adapter can provide an interface for different classes to work together. In the Object Adapter Pattern, the adapter contains an instance of the class it wraps. In this situation, the adapter makes calls to the instance of the wrapped object.
In Rails, the adapter pattern is often implemented to wrap API clients, providing a reusable interface for communicating with external APIs.
We'll use the adapter pattern to refactor the code we've written to communicate with the GitHub API and with the Twilio API.
GitHub Adapter
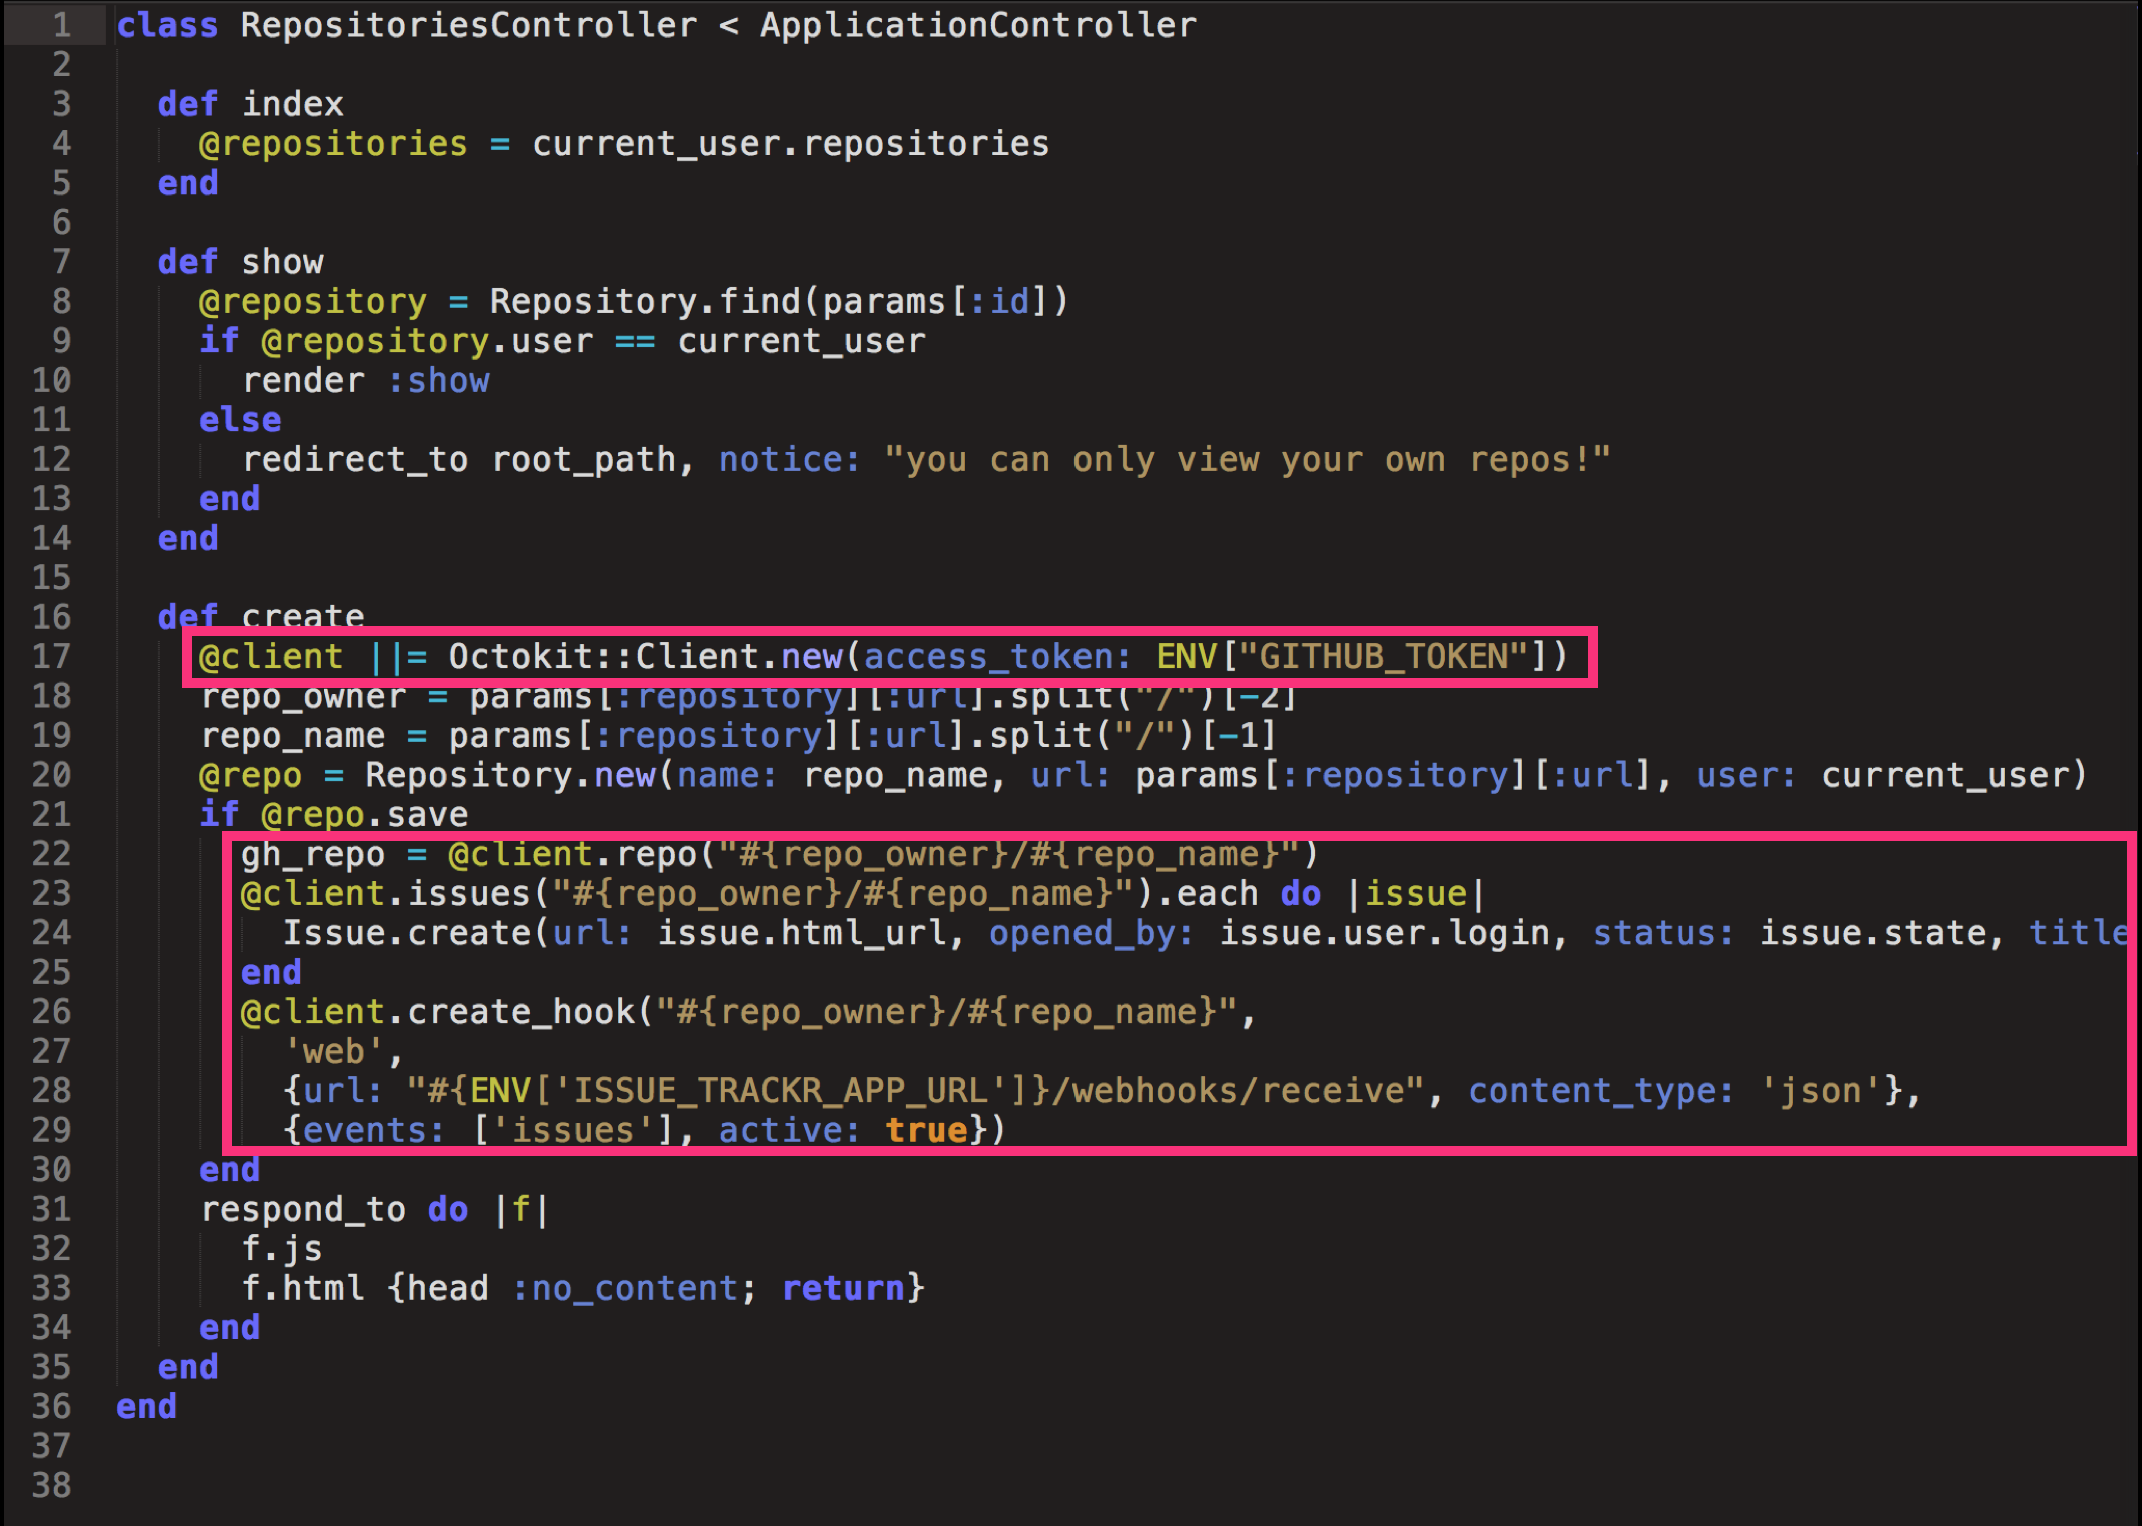
In this application, once a new repository is created (by a user filling out the form for a new repo and clicking "submit"), we use an Octokit client to request that repo's issues from GitHub, and to add a webhook to that repo.
Let's take a look:

All this GitHub-specific code is just hanging out in our Repositories Controller. Who does it think it is? Let's break down some of these code smells.
Code Smells
Here we are violating:
- Separation of concerns
- Single responsibility principles
- Basic human decency
We're violating the separation of concerns by placing GitHub-specific code in a file that should only be responsible for creating and serving repositories to the views, and by failing to encapsulate that code in it's own class.
We're violating the single responsibility principles by including this code in the Repositories Controller.
And we're violating basic human decency because...okay that one might be a bit of an exaggeration. A bit.
Let's eliminate these smells by implementing the adapter pattern.
Implementing the Adapter Pattern
First, we'll make a directory, app/adapters. And a file, app/adapters/adapter.rb. This is where we'll define our adapter module.
# app/adapters/adapter.rb

module Adapter
  class GitHub
    # coming soon!
  end
end
Why sub-class our GitHub wrapper? Well, we may want to wrap, or adapt, more than one concern.
For example, in this application alone we are talking to the GitHub API and the Twilio API (to send text message updates, but more on this later). We can create a series of adapters to interface our app with a number of external services.
Okay, let's build out our Adapter::GitHub class. How do we decide what methods to build? First, we need to think about what jobs our @client object is currently handling. Looks like it's in charge of:
- Retrieving issues for a given repo, and
- Adding a webhook to a given repo.
So, let's build these methods and simply move the code from the controller into the appropriate method:
# app/adapters/adapter.rb
module Adapter
  class GitHub

    def repo_issues
      @client.issues("#{repo.user.github_username}/#{repo.name}")
    end

    def create_repo_webhook
      @client.create_hook("#
        {repo.user.github_username}/#{repo.name}",
        'web',
        {url: "#
  {ENV['ISSUE_TRACKR_APP_URL']}/webhooks/receive", content_type: 'json'},
        {events: ['issues'], active: true})
    end
  end
Hmm, looks like both methods need the client object and the repository instance. Instead of defining both methods to take in those two arguments, which would be repetitive, let's keep our code DRY and build an initializer instead.
# app/adapters/adapter.rb
module Adapter
  class GitHub

    attr_accessor :repo

    def initialize(repo)
      @client ||=
        Octokit::Client.new(access_token:
          ENV["GITHUB_TOKEN"])
      @repo = repo
    end
    def repo_issues
      @client.issues("#
        {repo.user.github_username}/#
        {repo.name}")
    end

    def create_repo_webhook
      @client.create_hook("#
        {repo.user.github_username}/#
        {repo.name}",
        'web',
        {url: "#
  {ENV['ISSUE_TRACKR_APP_URL']}/webhooks/receive",
           content_type: 'json'},
        {events: ['issues'], active: true})
    end
  end
Now, let's use our new adapter in our controller:
# app/controllers/repositories_controller.rb

def create
  repo_owner = params[:repository][:url].split("/")[-2]
  repo_name = params[:repository][:url].split("/")[-1]
  @repo = Repository.new(name: repo_name, url:
    params[:repository][:url], user: current_user)
  if @repo.save
    client = Adapter::GitHub.new(@repo)
    client.repo_issues
    client.create_repo_webhook
  end
  respond_to do |f|
    f.js
    f.html {head :no_content; return}
  end
end
Much better! Now our GitHub communication code is nicely encapsulated in its own class, and it's not muddying up our Repositories Controller.
Now we're ready to build an adapter for our Twilio API-specific code.
Twilio Adapter
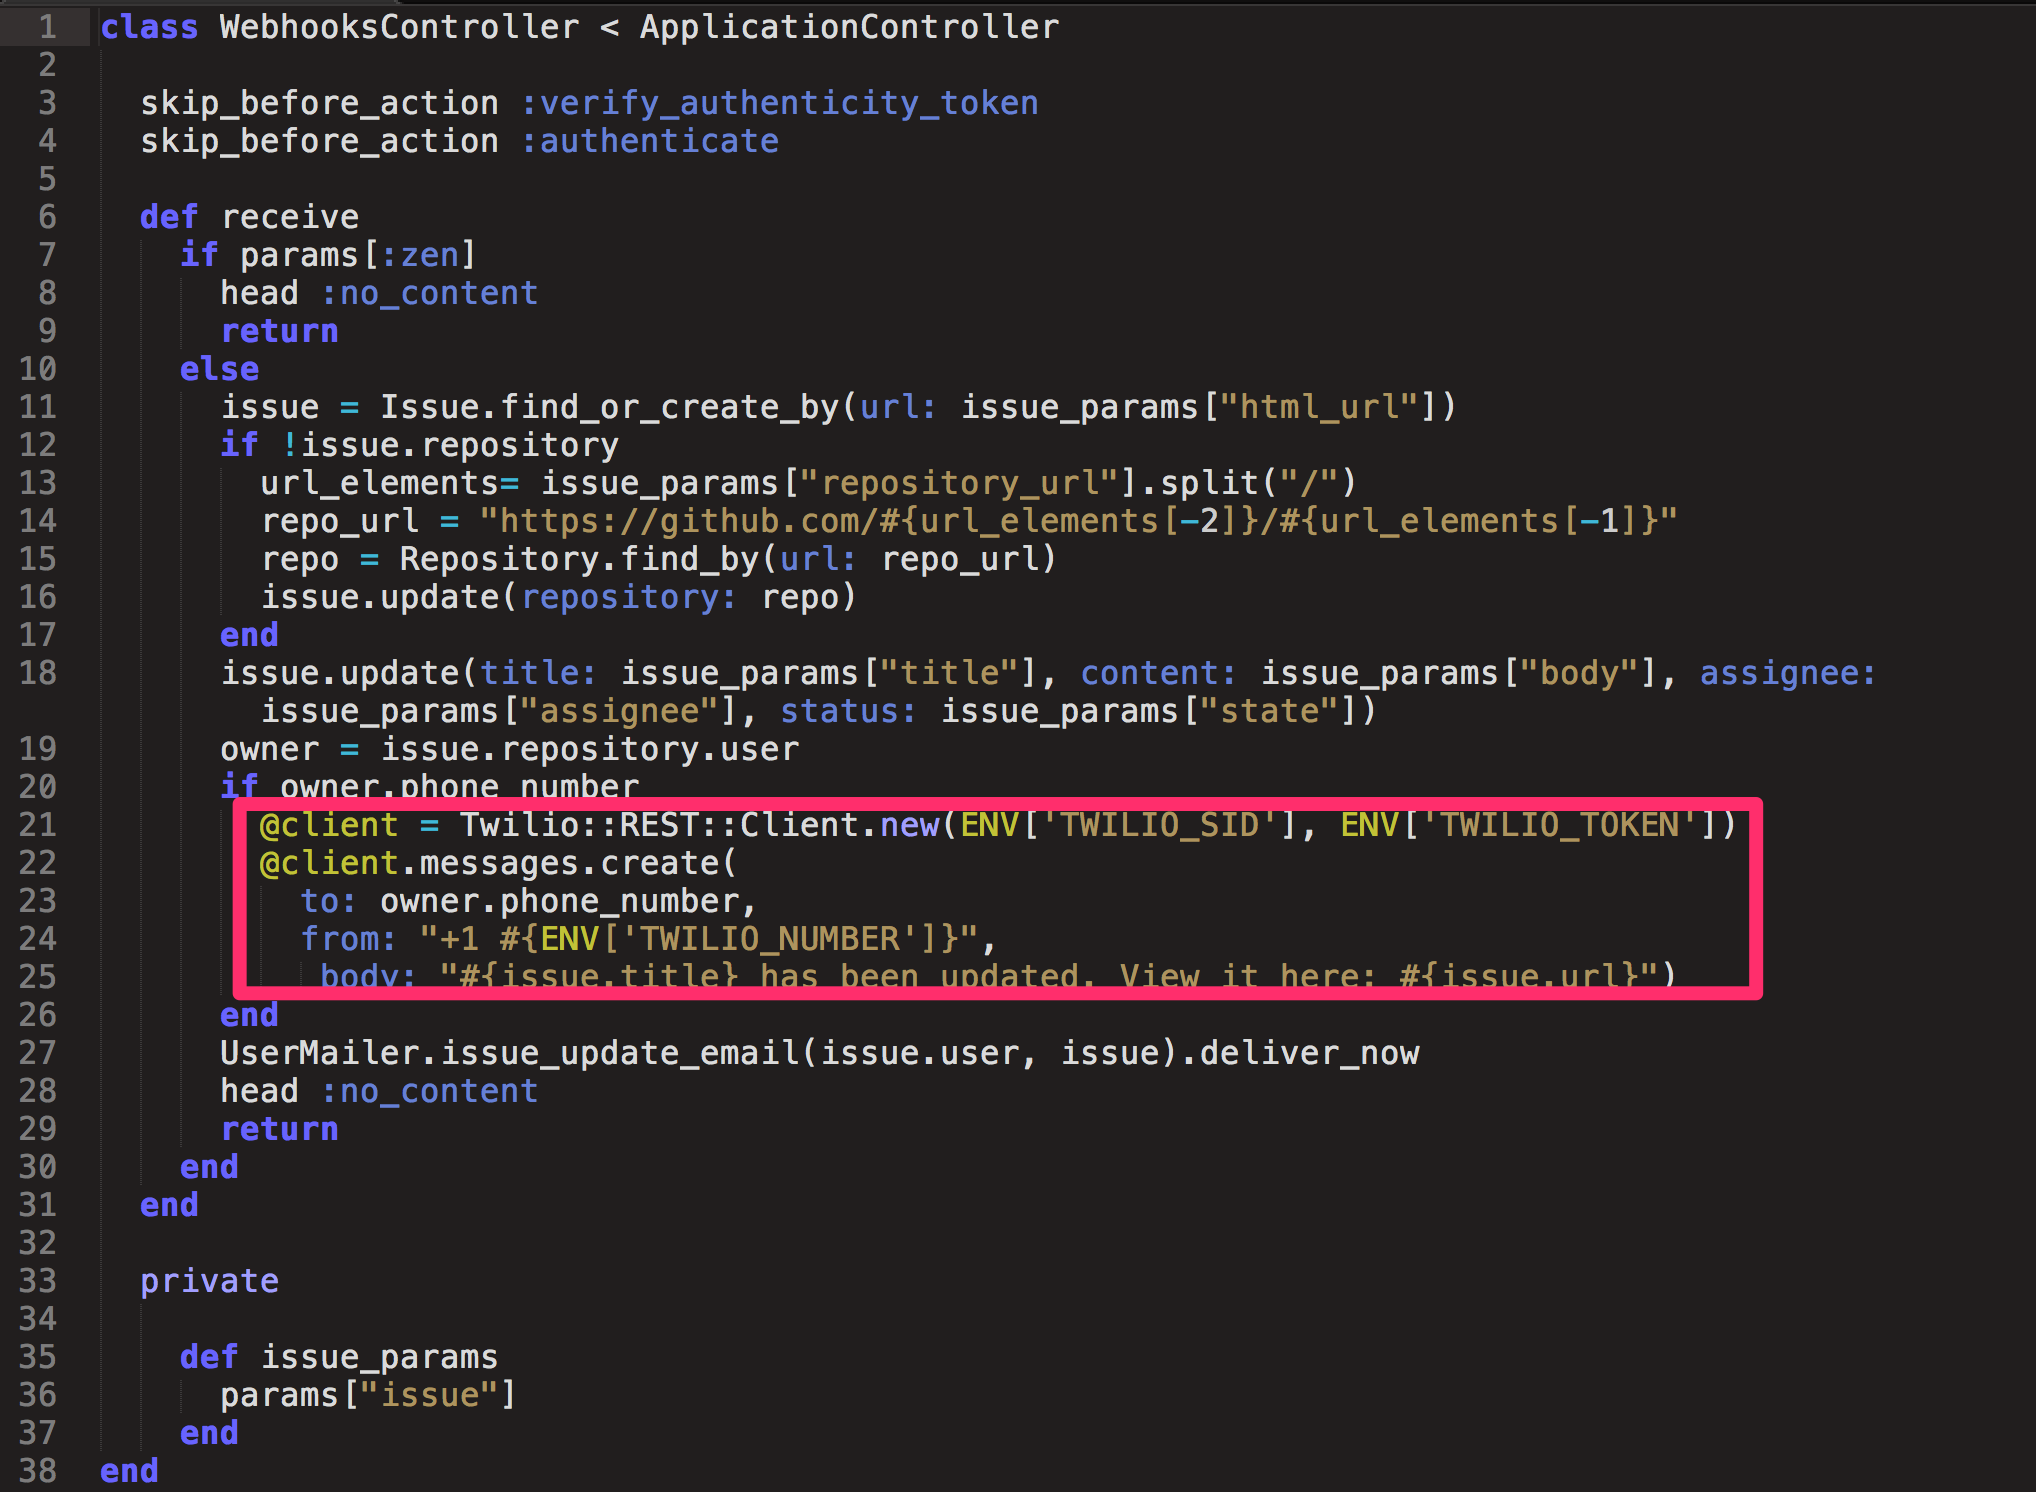
Our Twilio code lives in the WebhooksController. The app sends a text message update to the user every time a webhooked repository sends a payload to the app describing a new or updated issue.

Once again our API communication code is just hanging out, naked and exposed, in our controller. This gives off the same codes smells as our previous example. Let's add another sub-class to our adapter!
Implementing the Adapter Pattern, Again
We'll add another sub-class, TwilioWrapper, to our Adapter module.
# app/adapters/adapter.rb
module Adapter
  class GitHub
    ...
  end

  class TwilioWrapper
    # coming soon!
  end
end
Let's extract our Twilio-communicating code into our adapter. What is the job that our Twilio code is carrying out? That of sending a text message update.
So, we'll define a method, #send_issue_update_text, and place our Twilio code in there. We'll also define an #initialize method that instantiates the client, and sets an issue property, to make our class more flexible. This way, if we build additional TwilioWrapper methods in the future, we won't have to pass around the Twilio client and the issue as arguments.
# app/adapters/adapter.rb
module Adapter
  class GitHub
    ...
  end

  class TwilioWrapper
    attr_accessor :issue

    def initialize(issue)
      @client =
      Twilio::REST::Client.new(ENV['TWILIO_SID'],
        ENV['TWILIO_TOKEN'])
      @issue = issue
    end

    def send_issue_update_text(owner)
      @client.messages.create(
        to: owner.phone_number,
        from: "+1 #{ENV['TWILIO_NUMBER']}",
        body: "#{issue.title} has been updated.
          View it here: #{issue.url}")
    end
  end
end
Lastly, we'll use our new adapter sub-class in our controller:
# app/controllers/webhooks_controller.rb

def receive
  if params[:zen]
    head :no_content
    return
  else
    issue =
      Issue.find_by_url(issue_params["http_url"])
      ...
      Adapter::TwilioWrapper.new(issue)
        .send_issue_update_text(issue)
      head :no_content
      return
    end
  end
Much better!
Coming Up...
We've begun to clean up our code with our new GitHub and Twilio adapters, but our controllers are still fairly messy. In Part II of this series, we'll implement service objects to abstract away some of the code in Repositories#create and Webhooks#receive. Remember that you can find the code for this series here, and you can find a demo here.


