In my previous post, we learned how to build a Rails API that serves up data about a Graduate model. Our grads have a first and last name, a bio, a current job, a Linkedin, Github and Twitter link and a few other attributes. Our API accepts cross-origin HTTP requests from any source, and now we're ready to build a separate, stand-alone, front-end application that requests graduate data from the API and serves it up to the client with some beautiful, classy styling. Our front-end app will be built using Ember.js.
What is Ember.js?
Ember is a front-end framework for building ambitious web applications. It uses the MVC framework to serve data to Handlebars views and templates that update automatically as the underlying data changes. Ember's components allow you to create your own application-specific HTML tags, which you can implement with Handlebars. Ember also makes data retrieval and serialization simple: you don't need to display JSON retrieved from your server. Ember does it for us! Don't just take my word for it though––let's start building.
Setting Up Our Environment
-
Installing node.js: Node is javascript for writing web applications on a server. If you haven't done so already, install node here. We won't be using node directly, but we will be using the node package manager, npm, to install the ember command line interface that we'll use to generate and work with our ember app.
-
$ npm install -g ember-cli -
Install Bower: Bower is a package manager for the web. It will take care of finding and install packages and libraries that our front-end app might use. Including bootstrap themes, fonts, javascript plug-ins, etc. It manages these packages in your app's
bower.jsonfile. It's similar to how a Gemfile functions in a Rails app.$ npm install -g bower
Generating Our App
Now that we have our package managers and ember and ember's command line interface installed, we're ready to generate our app with the following command:
ember new <app name>
This is very similar to the rails new command for generating an app that you may be familiar with.
This generates an app with the following file structure:
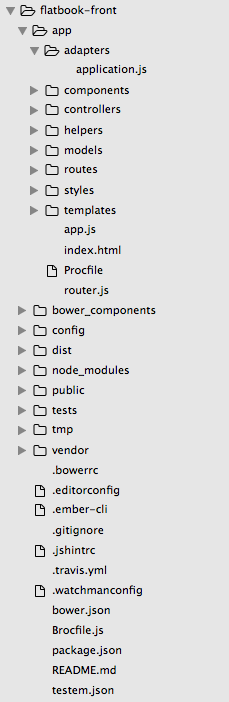
There is a lot here. Some of it we'll use and some of it we won't. But there are a few notables files and directories:
- The
adaptersare responsible for connecting our app to it's data source, in this case our Rails API. - The
controllersallow us to decorate our model with display logic. (This is different than how we use controllers in Rails). - The
modelsdefine the attributes of each model (in this case, we have just one, Graduate). These attributes are persisted to the server. - The
routesdefine our routes - The
templatesrender the data for the client to view
Now, you can boot up your server and visit your ember app via this command:
$ ember s
Building our App
Step 1: Connecting our Ember app to our Rails API
In order to tell our Ember application to retrieve data from our Rails API, we need to create an application adapter. We'll use the ember CLI to generate an application.js file in our adapter directory.
$ ember generate adapter application
Now, in app/adapters/application.js, place the following code:
import DS from 'ember-data';

export default DS.ActiveModelAdapter.extend({
  namespace: 'api/v1',
  host: 'https://flatbook-api.herokuapp.com'
});
Let's break down what's happening here. First things first:
What is Ember Data?
Ember Data is a library for managing model data an Ember app. Ember Data is persistence agnostic––it doesn't care where the model data comes from. Consequently, it works just as well with JSON APIs over HTTP as it does with streaming WebSockets or local IndexedDB storage.
All ember data objects are namespaced under DS.
Understanding our Adapter
An adapter is an object that receives requests from a store and then makes the appropriate request to your app's persistence layer––usually an HTTP API (in this case, our Rails API).
The adapter for our Ember app is a REST adapter. The REST adapter allows our store to communicate with an HTTP server by transmitting JSON via XHR. Most Ember.js apps that consume a JSON API should use the REST adapter.
Sidenotes before continuing...
###### What is the Ember store?
You Ember app's store contains all of the data for records loaded from the server. It is also responsible for creating instances of DS.Model that wrap the individual data for a record, so that they can be bound to in your Handlebars templates.
What is XHR?
XMLHttpRequest is an API available to web browser scripting languages (like JavaScript). It is used to send HTTP or HTTPS requests to a web server and load the response data back into the script.
Back to our adapter...
Our adapter is an extension of the ActiveModelAdapter. The ActiveModelAdapter is a subclass of the RESTAdapter designed to integrate with a JSON API that uses an underscored naming convention instead of camelCasing, which perfectly describes our Rails API. The ActiveModelAdapter subclass has been designed to work with the active_model_serializers Ruby gem, which is exactly what we used to serialize our data in our Rails API.
From the Ember docs: "this adapter extends the DS.RESTAdapter by making consistent use of the camelization, decamelization and pluralization methods to normalize the serialized JSON into a format that is compatible with a conventional Rails backend and Ember Data."
In other words, the ActiveModelAdapter will help to pair the data that comes down to the Ember app from the Rails API with it's JS camelCase equivalent.
For example, in our Rails API, we have a Graduate model that produces graduate objects. Each graduate has a first_name, among other attributes. Our API serializes these attributes and sends them to requesters (like our Ember app) as JSON that would represent a first_name attribute as "first_name". Our Ember Graduate model will have a corresponding attribute, firstName and our adapter will connect the two so that the Ember graduate object can take the firstName of a corresponding JSON "first_name" node. More on this in just a minute, but first...
Let's take a step-by-step look at our adapter:
-
Import the Ember Data library for managing our models:
import DS from 'ember-data'; -
Extend, or add functionality to, Ember's Adapter class that. The code inside our our extension of the adapter tells our adapter object to respond to requests for data by sending HTTP requests to our Rails API hosted at
https://flatbook-api.herokuapp.com.
Now we're ready to discuss our Ember models.
Step 2: Defining our Model
Let's generate our Graduate model which will be responsible for wrapping our API data as an Ember object. Execute the following command (given to us by our installation of the Ember CLI) in your terminal:
$ ember generate model graduate
Now, we can set up our Graduate attributes in app/models/graduate.js
import DS from 'ember-data';

export default DS.Model.extend({
  firstName: DS.attr('string'),
  lastName: DS.attr('string'),
  cohort: DS.attr('string'),
  currentJob: DS.attr('string'),
  bio: DS.attr('string'),
  news: DS.attr('string'),
  website: DS.attr('string'),
  picture: DS.attr('string'),
  linkedin: DS.attr('string'),
  twitter: DS.attr('string'),
  github: DS.attr('string'),
  createdAt: DS.attr('date'),
  updatedAt: DS.attr('date'),
});
What is an Ember model?
A model is a class that defines the properties and behavior of the data that you present to the user. DS.Model is the model class that all Ember Data records descend from. Now, all graduate objects are equipped with the above attributes, just as occurs when we are defining the attributes and methods of a model in a Rails app.
As described above, our adapter is responsible for connecting the JSON that is served to the Ember app by our Rails API to the Ember Data objects that will be presented to our viewer. So, when we set each attribute via lines like this:
firstName: DS.attr('string'),
We are telling the first name attribute of a the Graduate model to be whatever is provided by the server. Meanwhile, the adapter takes over the job of matching up firstName attributes of Ember graduates with first_name attributes of Ruby objects, sent to our Ember app via our Rails API as JSON.
Step 3: Building Routes
Now that we've set up our adapter and our models, we're ready to establish our routes.
The router of your Ember app is responsible for loading data and displaying templates. It does so by matching the current URL to the routes that we define. First, we establish our router, then we write the routes.
The Router
Let's generate our routes:
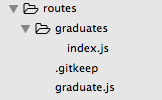
$ ember g route graduate
Your routes directory should now look like this:
Now, in app/router.js, place the following code:
import Ember from 'ember';
import config from './config/environment';

var Router = Ember.Router.extend({
  location: config.locationType
});

export default Router.map(function() {
  this.resource('graduates', function() {
    this.resource('graduate', { path: '/:graduate_id' });
  });
});
Next, open up app/routes/graduates/index.js and place the following code:
import Ember from 'ember';

export default Ember.Route.extend({
  model: function() {
    return this.store.find('graduate');
  }
});
How does the router work?
The responsibilities of a resource's route handler is to convert a URL into a model.
So, the above code in our router is telling our app to respond to requests for the /graduates URL by sending all available graduates to the graduates template (more on templates coming up).
Because /graduates represents a fixed model, we don't need any additional information to know what to retrieve. In other words, we don't need any parameters in our URL for retrieving something like a specific graduate. However, if we want a route to represent a specific, we would not want to have to hardcode every possible post into the router––i.e. define a route for graduates/1, graduates/2, etc. Let's move onto our individual graduate router to find out how we will handle this:
Routing with Dynamic Segments
In app/routes/graduate.js place the following code:
import Ember from 'ember';

export default Ember.Route.extend({
  model: function(params) {
    return this.store.find('graduate', params.graduate_id);
  }
});
Here, we are telling our router to build a graduates/:graduate_id route. The dynamic segment is the part of the URL that is filled in by the current model's ID. So, the individual graduate router above will take in the params, grab the graduate's id, and feed that data, from the store to the graduate template.
Bringing it all together
The route is not responsible for getting the data from the Rails API and turning that data into Ember objects. That is the job of the adapter, coupled with the model. The adapter gets the data from the API, the model turns that JSON into Ember Data objects and then those Ember Data objects hang out in the store until the app receives a request. When a client types www.myapp.com/graduates, the router returns the appropriate Ember Data objects from the store to the templates, which render that data for the viewer.
Now we're ready to discuss the templates and how they render that data for the client.
Step 4: Templating
Ember.js uses the Handlebars templating library to render data for the client. If you're familiar with Rails, you can think of Handlbars + HTML like ERB + HTML. I think the Ember documentation says it best:
It may help to think of your Handlebars templates as an HTML-like DSL for describing the user interface of your app. And, once you've told Ember.js to render a given template on the screen, you don't need to write any additional code to make sure it keeps up-to-date.
Usually, it is the controller's job to feed the appropriate data to the view. The controller gets the Ember Data objects from the routes and passes it to the templates, decorating it in any way you define on the way. Our application is forgoing the controller, however, and sending plain, un-decorated data to our templates.
What are Handlebars Expressions?
Handlebars expressions are essentially Ember Data object attributes wrapped in {{}}, or double curly braces. These expressions are bindings aware. That means that if the values used by your templates ever change, your HTML will be updated automatically.
Our Templates
###### The Application Template
Your application should have been generated with an application.hbs, our application template. We'll also create a app/graduates/index.hbs, which will act as our graduates index page, and a app/graduate.hbs, our individual graduate show page.
The Ember docs describe the application template like this:
The application template is the default template that is rendered when your application starts.
You should put your header, footer, and any other decorative content here. Additionally, you should have at least one
{{outlet}}: a placeholder that the router will fill in with the appropriate template, based on the current URL.
I've defined my application template with a header and footer, and it also includes the Handlebars {{outlet}} expression for rendering the appropriate data, depending on the URL of the page. Let's take a look:
<nav class="navbar navbar-default my-nav">
<div class="container-fluid">
<div class="navbar-header">
{{#link-to 'index' class="my-logo navbar-brand"}}<h2>// Flatbook</h2>{{/link-to}}
</div>
<div class="collapse navbar-collapse" id="bs-example-navbar-collapse-1">
<ul class="nav navbar-nav">
<li class="my-nav-item">{{link-to '// Graduates' 'graduates'}}</li>
</ul>
</div>
</div>
</nav>
{{outlet}}
<footer class="hidden-xs">
<p class="pull-left">© Copyright 2014. Rebound.</p>
<p class="pull-right">made with <span class="glyphicon glyphicon-heart-empty"></span> <a href="http://www.sophiedebenedetto.nyc">Sophie DeBenedetto</a> @ <a href="http://flatironschool.com">The Flatiron School</a></p>
</footer>
The {{outlet}} expression works much like yield does in the application.html.erb file of a Rails app.
You can note the use of the {{link-to}} Handlebars helper that takes two arguments––the string of text that the link will take the form of on the page, and the href of the link.
The Graduates Template
Our graduates template loads every graduate from the data store (courtesy of our Router, which looks at the URL and fetches the appropriate data to pass along to the model), iterates over each graduate, rendering certain attributes and linking to that grad's show page.
In app/templates/graduates/index.hbs we'll use the each Handlebars helper to iterate over all of the graduates:
{{#each graduate in model}}
   {{#link-to 'graduate' graduate class="thumb"}}
      <img src="{{graduate.picture}}" class="grad-image"
          alt="" title="" />
   {{/link-to}}

   {{#link-to 'graduate' graduate}}
       <h2 class="name">{{graduate.firstName}}
            {{graduate.lastName}}</h2>
   {{/link-to}}
       <p class="post-meta">{{graduate.cohort}}</p>
       <p>{{short-bio graduate.bio}}</p>
{{/each}}
The {{each}} helper operates on all of the objects loaded into this template from the data store by the router.
The code inside of the {{#each}} block will be repeated once for each item in the array, with the each item set to the graduate keyword.
The Graduate Template
Our graduate template loads an individual graduate. Let's take a look at app/templates/graduate.hbs
<p>{{model.firstName}}{{model.lastName}}</p>
<p>{{model.currentJob}}</p>
<p>{{model.bio}}</p>
<ul>
   <li>
     <a href="{{model.github}}"></a>
   </li>
   <li>
     <a href="{{model.twitter}}"></a>
   </li>
   <li>
     <a href="{{model.linkedin}}"></a>
   </li>
</ul>
</div>
And that's it! Stay tuned for my upcoming posts on building our own Handlebars helpers and implementing a Bootstrap theme in an Ember app. And, because this particular post lacks a clever, diverting theme, here is a minion: