The Edit Feature
This is Part VI of a eight part series on building a CRUD application with React + Redux. You can view the code for this project here. You can view the table of contents here
Next up, we'll build out the edit cat feature. We'd like our user to be able to seamlessly toggle between the edit form and cat detail view. Something like this:
So, our CatPage component needs to be keep track of whether or not a user is editing, and show the cat details or the edit cat form accordingly.
This means that we'll want to call on some kind of form component from our CatPage component. Further, this means that we will need to pass the cat down into that form component, keep track of changes made to that cat, and then fire off an action that sends the update cat request to the API.
Currently, the CatPage component stores the cat object as a prop, but component's don't update props. This is a problem if we want to be able to make changes to the cat object via the form. So, we'll have to give our CatPage component some internal state and store the cat in that stat.
That way, changes made via the form can update the CatPage component's internal state, and the updated cat object can then be sent to the API to be persisted.
Here's the flow we're looking to enact:
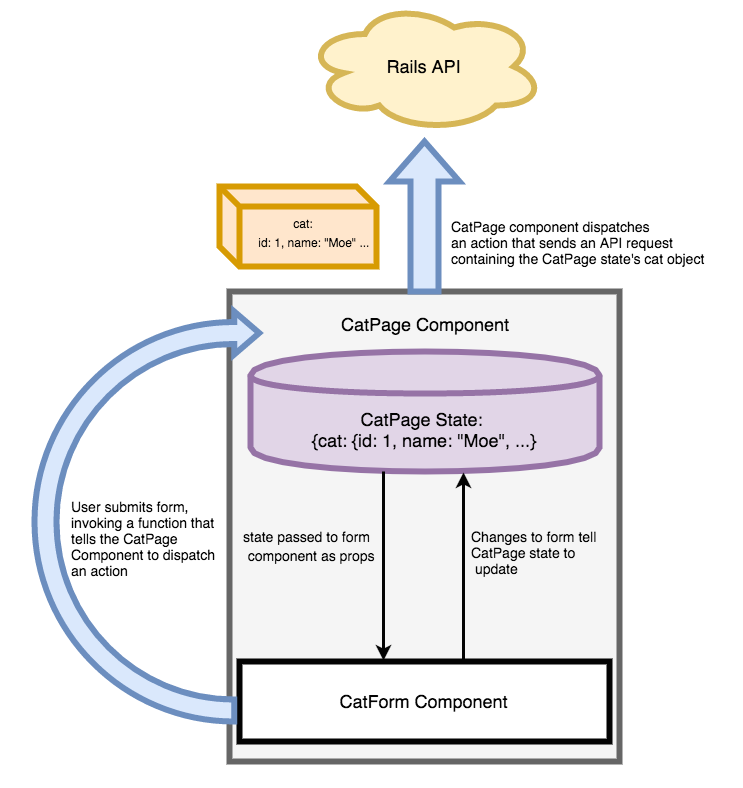
Let's break it down:
- CatPage component contains the cat object in its own internal sate. CatPage component contains some function that will receive an event like a form field being filled out and change the cat contained in state accordingly. CatPage component contains some function that responds to form submission.
- Cat component passes the cat from its internal state into the form component as props. CatPage also passes the two functions we just mentioned into the form component as props.
- When the user fills out the form, the form component triggers the CatPage component's function to update the CatPage's state with the changes to cat.
- When the user submits the form, the form component triggers CatPage's function to "submit" the form. CatPage does so by dispatching an action that sends a request to the API to persist the changes to the cat record.
- That same action will dispatch a success action upon receiving a successful response from the API. This action will be received by the cat reducer, which will create a new copy of state with the updated cat in it.
Let's build it!
Toggling State in a Container Component
But first, we have to enable the user to actually the see the edit cat form. So, we'll teach our CatPage component to render either the cat's details or the cat form, depending on whether or not the user is editing the cat.
We'll keep track of whether or not the user is editing the cat by giving the CatPage component an internal state with a property isEditing. We'll toggle the value of this property with the click of an "edit" button.
Defining Component State
We need to use a constructor function in our component in order to set state:
import React, {PropTypes} from 'react';
import {connect} from 'react-redux';
import HobbyList from '../hobbies/HobbyList';

class CatPage extends React.Component {
  constructor(props, context) {
    super(props, context);
    this.state = {isEditing: false};
  }

  render() {
    if (this.state.isEditing) {
      return (
      <div>
        <h1>edit cat</h1>
        < cat form coming soon!/>
      </div>
      )
    }
    return (
      <div className="col-md-8 col-md-offset-2">
        <h1>{this.state.cat.name}</h1>
        <p>breed: {this.state.cat.breed}</p>
        <p>weight: {this.state.cat.weight}</p>
        <p>temperament: {this.state.cat.temperament}</p>
        <HobbyList hobbies={this.state.catHobbies} />
      </div>
    );
  }
}
...
A note on super in our constructor function: We need to use this call to super in order to be able to access this inside our constructor function. Learn more about it here
We've set the initial isEditing property of our component's state to false. Then, we added an if condition to our render function to determine what to render.
Now, we'll add a button to the cat details portion of the component that will a trigger a function that toggles the isEditing property.
class CatPage extends React.Component {
  constructor(props, context) {
    super(props, context);
    this.state = {isEditing: false};
    this.toggleEdit = this.toggleEdit.bind(this);
  }

  toggleEdit() {
    this.setState({isEditing: !this.state.isEditing})
  }

  render() {
    if (this.state.isEditing) {
      return (
      <div>
        <h1>edit cat</h1>
        < cat form coming soon!/>
      </div>
      )
    }
    return (
      <div className="col-md-8 col-md-offset-2">
        <h1>{this.state.cat.name}</h1>
        <p>breed: {this.state.cat.breed}</p>
        <p>weight: {this.state.cat.weight}</p>
        <p>temperament: {this.state.cat.temperament}</p>
        <HobbyList hobbies={this.state.catHobbies} />
        <button onClick={this.toggleEdit}>edit</button>
      </div>
    );
  }
}
We've defined a function, toggleEdit, that gets fired on the click of the "edit" button. Let's take a close look at the following line we added to our constructor function:
this.toggleEdit = this.toggleEdit.bind(this)
Binding this To Component Functions
With the es5 method of creating components--React.createClass(), any functions we define within the component class autobind this to instances of the component.
The new es6 syntax for creating components, React.Component {} does not autobind this for us. So, we do it ourselves in the constructor function.
Now that we've built out the ability to toggle back and forth between the edit form and the cat details display, let's finish building out our CatPage's component's state to include the cat object we are displaying and updating.
Setting Component State from Props
We've already discussed why we need to store the given cat as a portion of our CatPage component's internal state, instead of simply at part of props. If we want to update the cat object (including its associated hobbies) before we send it off to the API, we need to store it in state, since props don't get changed by the component itself.
A user may also choose to update the cat's hobby collection. So, we'll also take our catHobbies prop and include it in the component's state.
We've already seen that we set a component's state in the constructor function. So, let's add our cat and the cat's hobbies to that state:
class CatPage extends React.Component {
  constructor(props, context) {
    super(props, context);
    this.state = {
      isEditing: false,
      cat: this.props.cat,
      catHobbies: this.props.catHobbies
    };
    this.toggleEdit = this.toggleEdit.bind(this);
  }
...
There's one last piece of data we need to be able to pass down in to our form component--a collection of hobbies properly formatted to display as checkboxes. Think about it--when we display our edit cat form, we want to display all of the hobbies, as checkboxes, with the hobbies that the cat already owns checked off for the user.
We'll create this collection in our mapStateToProps function, and include it in our component's state via the constructor function.
// src/components/cats/CatPage.js
...

function hobbiesForCheckBoxes(hobbies, cat=null) {
  return hobbies.map(hobby => {
    if (cat && cat.hobby_ids.filter(hobbyId => hobbyId == hobby.id).length > 0) {
      hobby['checked'] = true;
    } else {
      hobby['checked'] = false;
    }
    return hobby;
  });
}

function mapStateToProps(state, ownProps) {
  const stateHobbies = Object.assign([], state.hobbies)
  let checkBoxHobbies = [];
  let catHobbies = [];
  let cat = {name: '', breed: '', weight: '', temperament: '', hobby_ids: []};
  const catId = ownProps.params.id;
  if (catId && state.cats.length > 0 && state.hobbies.length > 0) {
    cat = getCatById(state.cats, ownProps.params.id);
    if (cat.hobby_ids.length > 0) {
      checkBoxHobbies = hobbiesForCheckBoxes(stateHobbies, cat);
      catHobbies = collectCatHobbies(stateHobbies, cat);
    } else {
      checkBoxHobbies = hobbiesForCheckBoxes(stateHobbies)
    }
  }
    return {cat: cat, checkBoxHobbies: checkBoxHobbies, catHobbies: catHobbies};
}
Let's update our CatPage Prop Type validations accordingly:
CatPage.propTypes = {
  cat: PropTypes.object.isRequired,
  catHobbies: PropTypes.array.isRequired,
  checkBoxHobbies: PropTypes.array.isRequired
};
Now, we can update our state definition in our constructor function once again:
class CatPage extends React.Component {
  constructor(props, context) {
    super(props, context);
    this.state = {
      isEditing: false,
      cat: this.props.cat,
      catHobbies: this.props.catHobbies,
      checkBoxHobbies: this.props.checkBoxHobbies
    };
    this.toggleEdit = this.toggleEdit.bind(this);
  }
...
There's only one problem. Earlier, we set up our mapStateToProps function to contain a default, empty cat object, as well as default, empty catHobbies and checkBoxHobbies collections. These default objects would get passed to props, should the component render before our application's state gets populated with the cat and hobby collections from our API.
When the actions that retrieve that data from the API are finished being handled by the reducers, and the new versions of state are pushed out to the components, the mapStateToProps function runs again, and the component re-renders with new props.
But wait! The constructor function will only be invoked once, not again and again every time application state changes and mapStateToProps get re-invoked. So, how will we insure that our CatPage component's internal state, which gets its cat, catHobbies and checkBoxHobbies properties from the component's props, gets updated when those props change?
For this, we will use the component lifecycle method componentWillReceiveProps.
Updating Component State with Lifecycle Functions
The componentWillReceiveProps function will be invoked every time a component's props are updated by a re-invocation of the mapStateToProps function. This is the perfect place to update the CatPage's state whenever props get updated.
class CatPage extends React.Component {
  ...
  componentWillReceiveProps(nextProps) {
    if (this.props.cat.id != nextProps.cat.id) {
      this.setState({cat: nextProps.cat});
    }
    if (this.props.checkBoxHobbies.length < nextProps.checkBoxHobbies.length) {
      this.setState({catHobbies: nextProps.catHobbies, checkBoxHobbies: nextProps.checkBoxHobbies});
    }
  }
  ...
}
The componentWillReceiveProps function will be automatically invoked after mapStateToProps with an argument of nextProps. This argument represents the new props that will be passed to our component. So, we check to see if our current cat object has an ID that matches the new cat object from mapStateToProps. If not, we can safely assume that the old cat object was our empty placeholder object, and we set our component's state to point cat at the new cat object.
Similarly, if the newProps.checkBoxHobbies collection is longer than the older props.checkBoxHobbies, we can safely assume that props have been updated with the complete hobbies collection. If so, we want to grab catHobbies and checkBoxHobbies from nextProps.
Now that our component's state is all set, we're ready to define the functions that will update that state in response to the user interacting with the edit form.
Container Component Callback Functions
Our CatPage component will define two functions--one function to respond to user changes to the cat via the form, and one function to respond to a user's submission of the form. Both of these functions will get passed to our form component as callbacks, and they will be invoked by the user's interaction with the form.
Let's start with the updateCatState function.
// src/components/cats/CatPage.js

...

class CatPage extends React.Component {
  constructor(props, context) {
    super(props, context);
    this.state = {
      cat: this.props.cat,
      catHobbies: this.props.catHobbies,
      checkBoxHobbies: this.props.checkBoxHobbies,
      isEditing: false
    };
    this.updateCatState = this.updateCatState.bind(this);
    this.toggleEdit = this.toggleEdit.bind(this);
  }

  updateCatState(event) {
    const field = event.target.name;
    const cat = this.state.cat;
    cat[field] = event.target.value;
    return this.setState({cat: cat});
  }
}
Coming up, we'll define our form component and tell it to trigger the updateCatState event when a user edits any of the cat form fields. Our updateCatState event function will receive the event of a user editing the form field. We'll use the value of that field to update the cat object stored in our component's internal state.
Updating the cat's hobbies will be a little trickier however. Remember that we dynamically generate a collection of hobbies in our mapStateToProps function by finding the hobbies in the application state's hobbies collection whose IDs are included in the given cat's hobby_ids array.
So, we'll build a separate function to respond to a user checking or unchecking hobby checkboxes on the cat edit form.
// src/components/cats/CatPage

...
class CatPage extends React.Component {
  constructor(props, context) {
    super(props, context);
    this.state = {
      cat: this.props.cat,
      catHobbies: this.props.catHobbies,
      checkBoxHobbies: this.props.checkBoxHobbies,
      isEditing: false
    };
    this.updateCatState = this.updateCatState.bind(this);
    this.updateCatHobbies = this.updateCatHobbies.bind(this);
    this.toggleEdit = this.toggleEdit.bind(this);
  }
  ...
  updateCatHobbies(event) {
    const cat = this.state.cat;
    const hobbyId = event.target.value;
    const hobby = this.state.checkBoxHobbies.filter(hobby => hobby.id == hobbyId)[0];
    const checked = !hobby.checked;
    hobby['checked'] = !hobby.checked;
    if (checked) {
      cat.hobby_ids.push(hobby.id);
    } else {
      cat.hobby_ids.splice(cat.hobby_ids.indexOf(hobby.id));
    }
    this.setState({cat: cat});

  }
  ...
}
Lastly, we'll define the function that handles the submission of the form. Our form submission function will be triggered by the user clicking the 'submit' button on our form component, and it will receive that event as an argument.
// src/components/cats/CatPage

...
class CatPage extends React.Component {
  constructor(props, context) {
    super(props, context);
    this.state = {
      cat: this.props.cat,
      catHobbies: this.props.catHobbies,
      checkBoxHobbies: this.props.checkBoxHobbies,
      isEditing: false
    };
    this.updateCatState = this.updateCatState.bind(this);
    this.updateCatHobbies = this.updateCatHobbies.bind(this);
    this.saveCat = this.saveCat.bind(this);
    this.toggleEdit = this.toggleEdit.bind(this);
  }
  ...
  saveCat(event) {
    event.preventDefault();
    this.props.actions.updateCat(this.state.cat);
  }
  ...
}
Notice that we're invoking an action here, updateCat. We'll define this action to send a PUT request to our API to persist the changes to this cat record. But we'll need to do a few things in order to dispatch actions from our component.
Dispatching Actions from a Component
Remember our connect function from earlier? You know, the one that subscribes our component to the store and hooks into the mapStateToProps function?
// src/components/cats/CatPage.js

export default connect(mapStateToProps)(CatPage);
The connect function actually takes in a second argument of another function, mapDispatchToProps. This function will be called with an argument of the dispatch function that we normally call on our store instance.
Inside mapDispatchToProps we invoke a function we get from Redux, bindActionCreators.
bindActionCreators takes in two arguments:
- The
dispatchfunction - A collection of action creators
The bindActionCreators function takes the action creators object and wraps each action creator in a call to dispatch. This produces a new object with keys that point to our actions, but, since each action creator was wrapped in dispatch, we can now invoke our actions directly.
The mapDispatchToProps function ensures that this brand-new object is available to our component as part of props.
// src/components/cats/CatPage.js
...
import {bindActionCreators} from 'redux';
import * as catActions from '../../actions/catActions';
...

function mapDispatchToProps(dispatch) {
  return {
    actions: bindActionCreators(catActions, dispatch)
  };
}
export default connect(mapStateToProps, mapDispatchToProps)(CatPage);
Let's update our CatPage Prop Type validation accordingly:
CatPage.propTypes = {
  cat: PropTypes.object.isRequired,
  catHobbies: PropTypes.array.isRequired,
  checkBoxHobbies: PropTypes.array.isRequired,
  actions: PropTypes.object.isRequired
};
Now that we can dispatch an updateCat action by invoking it directly from our component, let's go ahead and create that action and the corresponding CatApi function
The updateCat Action Creator
First, let's define a function in our CatApi that will send a PUT request to our API to persist changes to the relevant cat.
// src/api/catApi.js

class CatApi {
  ...
  static updateCat(cat) {
    const request = new Request(`http://localhost:5000/api/v1/cats/${cat.id}`, {
      method: 'PUT',
      headers: new Headers({
        'Content-Type': 'application/json'
      }),
      body: JSON.stringify({cat: cat})
    });
}
We'll invoke this function inside our updateCat action creator:
// src/actions/catActions.js
...
export function updateCat(cat) {
  return function (dispatch) {
    return catApi.updateCat(cat).then(responseCat => {
      dispatch(updateCatSuccess(responseCat));
    }).catch(error => {
      throw(error);
    });
  };
}
Notice that on successful resolution of our API request, we're dispatching an action, updateCatSuccess. Let's define that action creator now, and teach our cat reducer to respond to it.
// src/actions/catActions.js
...
export function updateCatSuccess(cat) {
  return {type: types.UPDATE_CAT_SUCCESS, cat}
}
We'll add a constant, UPDATE_CAT_SUCCESS to our action types file:
// src/actions/actionTypes.js

export const LOAD_CATS_SUCCESS = 'LOAD_CATS_SUCCESS';
export const LOAD_HOBBIES_SUCCESS = 'LOAD_HOBBIES_SUCCESS';
export const UPDATE_CAT_SUCCESS = 'UPDATE_CAT_SUCCESS';
We'll teach our cat reducer to handle receiving the dispatch of this action by returning a new copy of state that includes the updated cat:
// src/reducers/catReducer.js

import * as types from '../actions/actionTypes';
import initialState from './initialState';

export default function catReducer(state = initialState.cats, action) {
  switch(action.type) {
    case types.LOAD_CATS_SUCCESS:
      return action.cats
    case types.UPDATE_CAT_SUCCESS:
      return [
        ...state.filter(cat => cat.id !== action.cat.id),
        Object.assign({}, action.cat)
      ]
  }
}
Note that we're using the spread operator, together with Object.assign to create a new copy of state, with a new, updated, copy of the relevant cat.
The new state will trigger a re-render of the CatPage component, after a re-invocation of the mapStateToProps function, thus re-rendering the component with the updated cat information.
Now we're ready to build out the form component that will allow the user to make these changes and trigger these functions.
The CatForm Component
We'll define our component, CatForm, and render it on the CatPage component, passing in the cat object and our callback functions in the following manner:
// src/components/cats/CatPage.js
...
import CatForm from './CatForm'

class CatPage extends React.Component {
...
  render() {
    if (this.state.isEditing) {
      return (
      <div>
        <h1>edit cat</h1>
        <CatForm
          cat={this.state.cat}
          hobbies={this.state.checkBoxHobbies}
          onSave={this.saveCat}
          onChange={this.updateCatState}
          onHobbyChange={this.updateCatHobbies}/>
      </div>
      )
    }
    return (
      <div className="col-md-8 col-md-offset-2">
        <h1>{this.state.cat.name}</h1>
        <p>breed: {this.state.cat.breed}</p>
        <p>weight: {this.state.cat.weight}</p>
        <p>temperament: {this.state.cat.temperament}</p>
        <HobbyList hobbies={this.state.catHobbies} />
        <button onClick={this.toggleEdit}
          className="btn btn-default">edit</button>
      </div>
    );
   }
  }
}
Let's build our CatForm component:
import React, {PropTypes} from 'react';
import TextInput from '../common/TextInput';

class CatForm extends React.Component {
  render() {
    const boxes = this.makeCheckBoxes();
    return (
      <div>
        <form>
          <TextInput
            name="name"
            label="name"
            value={this.props.cat.name}
            onChange={this.props.onChange}/>

          <TextInput
            name="breed"
            label="Breed"
            value={this.props.cat.breed}
            onChange={this.props.onChange}/>

          <TextInput
            name="weight"
            label="weight"
            value={this.props.cat.weight}
            onChange={this.props.onChange}/>

          <TextInput
            name="temperament"
            label="temperament"
            value={this.props.cat.temperament}
            onChange={this.props.onChange}/>

          <input
            type="submit"
            disabled={this.props.saving}
            className="btn btn-primary"
            onClick={this.props.onSave}/>
        </form>
      </div>
  );
  }
}

CatForm.propTypes = {
  cat: React.PropTypes.object.isRequired,
  hobbies: React.PropTypes.array.isRequired,
  onSave: React.PropTypes.func.isRequired,
  onChange: React.PropTypes.func.isRequired
};

export default CatForm;
Here we're relying on yet another component, TextInput, that we'll define. We'll define it in subdirectory of src/components called common, since we may need this component for future features involving creating/editing hobbies.
// src/components/common/TextInput.js

import React, {PropTypes} from 'react';

const TextInput = ({name, onChange, placeholder, value}) => {
  return (
    <div className="form-group">
      <label htmlFor={name}>{label}</label>
      <div className="field">
        <input
          type="text"
          name={name}
          className="form-control"
          placeholder={placeholder}
          value={value}
          onChange={onChange}/>
      </div>
    </div>
  );
};

TextInput.propTypes = {
  name: PropTypes.string.isRequired,
  onChange: PropTypes.func.isRequired,
  placeholder: PropTypes.string,
  value: PropTypes.string
};

export default TextInput;
So far so good. But, you may have noticed that our CatForm component isn't displaying any hobby checkboxes. Let's build a a checkbox component and use it to display the properly checked/unchecked hobby checkboxes for our form. We'll give each checkbox component the onHobbyChange callback action that we passed to CatForm as a prop. Recall we set CatForm's onHobbChange property to the updateCatHobbies function that we defined in the CatPage component.
// src/components/common/CheckBox.js

import React, {PropTypes} from 'react';

class CheckBox extends React.Component {
  render() {
    return (
     <div className="field">
        <div>
          <label>{this.props.item.name}</label>
          <input
            type="checkbox"
            name={this.props.item.name}
            value={this.props.item.id}
            checked={this.props.item.checked}
            onChange={this.props.handleChange}/>
        </div>
      </div>
    );
  }
}

CheckBox.propTypes = {
  item: PropTypes.object.isRequired,
  handleChange: PropTypes.func.isRequired
};

export default CheckBox;
Now we need to build these checkboxes into our form:
import React, {PropTypes} from 'react';
import TextInput from '../common/TextInput';
import CheckBox from '../common/CheckBox';

class CatForm extends React.Component {
  constructor(props) {
    super(props);
    this.makeCheckBoxes = this.makeCheckBoxes.bind(this);
  }

  makeCheckBoxes() {
    return this.props.hobbies.map(hobby => {
      return (
        <CheckBox
          item={hobby}
          handleChange={this.props.onHobbyChange}
          key={hobby.id}/>
      )
    })
  }

  render() {
    const boxes = this.makeCheckBoxes();
    return (
      <div>
        <form>
          <TextInput
            name="name"
            label="name"
            value={this.props.cat.name}
            onChange={this.props.onChange}/>

          {boxes}

          <TextInput
            name="breed"
            label="Breed"
            value={this.props.cat.breed}
            onChange={this.props.onChange}/>

          <TextInput
            name="weight"
            label="weight"
            value={this.props.cat.weight}
            onChange={this.props.onChange}/>

          <TextInput
            name="temperament"
            label="temperament"
            value={this.props.cat.temperament}
            onChange={this.props.onChange}/>

          <input
            type="submit"
            disabled={this.props.saving}
            value={this.props.saving ? 'Saving...' : 'Save'}
            className="btn btn-primary"
            onClick={this.props.onSave}/>
        </form>
      </div>
  );
  }
}

CatForm.propTypes = {
  cat: React.PropTypes.object.isRequired,
  hobbies: React.PropTypes.array.isRequired,
  onSave: React.PropTypes.func.isRequired,
  onChange: React.PropTypes.func.isRequired,
  onHobbyChange: React.PropTypes.func.isRequired
};

export default CatForm;
And that's it! Let's sum up the overall flow of the edit feature before we move on.
Putting It All Together
To successfully edit a cat, our app goes through the following:
- User clicks the "edit" button on the cat show page, which toggles that CatPage component's
isEditingproperty totrue. - The CatForm component is therefore rendered, receiving a number of things from CatPage as props:
- The
catobject - The
updateCatStatefunction as a callback - The
updateCatHobbiesfunction as a callback - The
saveCatfunction as a callback.
- The user makes changes to the form fields that describe the cat's attributes. Each change triggers the
updatCatStatefunction in the CatPage component, which has the effect of updating that component's internal state to reflect changes to the cat object stored there. - The user submits the form. This triggers the
saveCatfunction in the CatPage component. This function dispatches an action,updateCat, which sends an API request. - When that API request successfully resolves, the
updateCataction creator that made it will dispatch another action,updateCatSuccess. - The cat reducer receives this action, and responds by creating a new copy of state that reflects the changed cat.
- This triggers a re-render of all components that are connected to the store, causing the CatPage component to re-render with the new data from the application state.
All right, we're ready to move on to the next part of our app--creating new cats!