In an earlier post, we took a look at JWT authentication in Rails, and implemented a JWT authentication system using the Knock gem.
Here, we'll drop down a level and re-build our JWT authentication system from scratch, without the help of the Knock gem. You can check out the code for this post here, and you can check out the client-side portion of this project, written in Ember, here.
Let's get started!
Authentication in a Rails API
Authentication when working with CORS always presents an interesting challenge. In a normal (i.e. non-API) Rails app, we "log in" a user by storing their unique user ID in the session store. This means that authentication information is stored on the server side, in the session hash. In other words, our server becomes stateful, keeping track of whether or not a user is "logged in", and who that user is.
What happens in a Rails API, then, when the client is divorced from the server? Well, we'll need to tell the client, i.e. our Ember app, to store some kind of unique identifier and send that unique identifier to the Rails API with every request. Rails can then use the unique identifier, or token, to identify the user making the request.
This is the basic model of Ember Simple Auth. With the Ember Simple Auth add-on, we can authorize our user like this:
- User "logs in" in via the browser, and Ember grabs the user's email and password and sends them to Rails, requesting authentication.
- Rails looks up the user. If the user can be authenticated, Rails sends that user's unique token back to Ember.
- Ember stores that token in the session store, and sends it back to Rails with every subsequent requests.
- Rails receives any such requests, uses the token to look up the current user and return requested data back to Ember, the client.
- When someone "logs out", Ember removes the token from the session store, and subsequent requests to rails do not include that token. Rails therefore is not able to find a "current user".
This token-based authentication system is described in an earlier post, if you want to learn more.
One downside of this approach, however, is that it necessitates generating a unique token for every user created, persisting that token in the database, and querying the database using that token every time we want to authenticate a user.
Wouldn't it be great if we could authenticate the user in a stateless manner, without storing tokens in the database? Wouldn't it be even greater if we could do that via requests that are compact and self-contained?
Well, lucky for us, there's JWT Authentication.
What is JWT Authentication?
JSON Web Token (JWT) Authentication is a compact, URL-safe means of representing claims to be transferred between two parties. The claims in a JWT are encoded as a JSON object that is used as the payload of a JSON Web Signature (JWS) structure or as the plaintext of a JSON Web Encryption (JWE) structure, enabling the claims to be digitally signed or integrity protected with a Message Authentication Code (MAC) and/or encrypted.*
In plain English, JWT allows us to authenticate requests between the client and the server by encrypting authentication information into a compact JSON object. Instead of, say, passing a user's own unique token (which we would need to persist to the database), or (god forbid), sending a user's raw email and password with every authentication request, JWT allows us to encrypt a user's identifying information, store it in a token, inside a JSON object, and include that object in every request that requires authentication.
Let's take a closer look at how that cycle might work, using the example of an Ember app + Rails API.
- User fills out the log in form via the Ember app and hits "log in!"
- Ember
POSTs user's email and password to the Rails API. - Rails receives the
POSTrequest and and queries the database for the right user. If the user can be authenticated... - We'll use JWT to encrypt that user's unique ID into a compact and secure JSON Web Token.
- This token is then included in the response that Rails sends back to Ember.
- Ember stores the encrypted JWT token in local storage, retrieving it and sending it back to Rails, as the
HTTP Authenticationheader in any authenticated requests.
So, what's so great about this system?
Well, for one thing, we are not storing a unique user token in our database. Instead, we are encrypting the user's unique identifying info in our token, and decrypting it on the Rails side when we need to identify the "current user". Secondly, our server is not responsible for keeping track of the current user, as is the case when we use Rails' session object.
If you're not yet convinced of how great this is, check out the jwt.io documentation. It offers some very clear and concise info.
JWT Encryption: How Does it Work?
JWT tokens are encrypted in three parts:
- The header: the meta-data describing the encryption algorithm and type of token
- The payload: the actual data concerning the user (id, email, etc.)
- The signature: special combo of header info + payload to ensure that the sender of the token is really you!
Let's take a look at an example, using the JWT Ruby library to encode our very own token!
Given this information:
{user_id: 1}- hmac secret:
$39asdulawk3j489us39vm9370dmsZ - encryption algorithm:
HS256
We can encrypt our token in the following way:
require 'jwt'

JWT.encode(
  {user_id: 1},
   hmac,
   "H256")
And it will return our three part JWT:
QyJ0asdfjos.ald925lIn0.eyJ0ZXN0Ijas39uZGF0YSJ9.
Similarly, to decode our token, we can use the following JWT Ruby code, where token is set equal to the above JWT, and hmac is set equal to the hmac secret we used to encrypt that token:
JWT.decode(token, hmac, "H256")

=> [
     {"user_id"=>"1"},
     {"typ"=>"JWT", "alg"=>"HS256"}
]
As we've seen here, it's not too complicated to implement JWT in Ruby. So, let's get started on implementing it in Rails.

Set Up
This post assumes that you have a Rails 5 API app up and running, and that the app has a User model. We're using the bcrypt gem to hash and store user passwords, so your User model should include the has_secure_password method.
Building a JWT Auth Library
Since we'll need to regularly encode and decode JWTs, it makes sense to write a plain old Ruby class (PORO), that will wrap up some of that functionality.
We'll put this class, which we'll call Auth, inside our lib/ directory.
- Add the jwt gem to your Gemfile and bundle install:
# Gemfile

gem 'jwt'
- Create a file
lib/auth.rb - Add your
lib/directory to the Rails autoload path:
# config/application.rb

config.autoload_paths << Rails.root.join('lib')
- Define your Auth class to have a method,
.issue, which will be responsible for generating a JWT from a given user's information, and a.decodemethod, which will decode a given JWT:
require 'jwt'

class Auth

  def self.issue(payload)

  end

  def self.decode(token)

  end

end
We'll start with our .issue method.
Generating a JWT: Auth.issue
This method will simply wrap the JWT.encode method that the jwt gem makes available to us. This method takes in three arguments:
- The data, in the form of a hash, that you will to encode in the JWT
- The key to your hashing algorithm
- The type of hashing algorithm
For example:
payload = {name: "sophie"}
secret_key = "masd82348$asldfja"
algorithm = "HS256"

JWT.encode(payload, secret_key, algorithm)
=> "esdiva23euihrusdfcnkjz2snciusdhuihr7480y2qikjh8"
Tada!
How, though, will we generate a super secret key?
Generating a Hashing Key
We'll use the Digest module that is native to Ruby to generate our secret key. We'll generate our key in the command line, in the Pry console, and add it to our environment as an environment variable. We'll use Figaro to make sure that environment variable doesn't get pushed up to GitHub.
$ pry
pry > Digest::SHA256.digest('beyonce')
 => "\x85\x11\xFA\xEF\xF2A\x11\xC7\x90\x9C!{\xDC\x11W\xFB\x93\xE5\xA3\xCD\xE3\xC2\x9E#7\xC4\xCDa\xCF\xC9/\xEA"
We'll add it to our application.yml like this:
# config/application.yml
AUTH_SECRET: \x85\x11\xFA\xEF\xF2A\x11\xC7\x90\x9C!{\xDC\x11W\xFB\x93\xE5\xA3\xCD\xE3\xC2\x9E#7\xC4\xCDa\xCF\xC9/\xEA
Okay, now we're ready to finish up that Auth.issue method.
Note: You can also generate a secret in Rails by running rake secret in the command line in the directory of your app.
Auth.issue
# lib/auth.rb
require 'jwt'

class Auth

  ALGORITHM = 'HS256'

  def self.issue(payload)
    JWT.encode(
      payload,
      auth_secret,
      ALGORITHM)
  end

  def self.decode(token)

  end

  def self.auth_secret
    ENV["AUTH_SECRET"]
  end
end
Notice that the hashing algorithm is stored in a class constant, ALGORITHM. This is because our .decode method will also need to access that information. Similarly, we've wrapped our accessing of the ENV["AUTH_SECRET"] in a method call, because we'll also need that data for our .decode method
While we're here, let's define that decode method.
Decoding a JWT: Auth.decode
Our Auth.decode method will simply wrap the JWT.decode method that the jwt gem makes available to us. This method takes in three arguments:
- The JWT that we want to decode,
- The hashing algorithm's secret key
- The type of hashing algorithm
# lib/auth.rb
require 'jwt'

class Auth

  ALGORITHM = 'HS256'

  def self.issue(payload)
    JWT.encode(
      payload,
      auth_secret,
      ALGORITHM)
  end

  def self.decode(token)
    JWT.decode(token,
      auth_secret,
      true,
      { algorithm: ALGORITHM }).first
  end

  def self.auth_secret
    ENV["AUTH_SECRET"]
  end
end
Okay, now we're ready to use our Auth library in our controllers.
Authorizing a User in the Sessions Controller
First, we'll need to define a route that maps to Sessions#create
# config/routes.rb

...
post '/login', to: "sessions#create"
This is the route to which our client-side application needs to POST the user's email and password, when the user fills out the log in form.
Let's build out the create action of our Sessions Controller.
# app/controllers/sessions_controller.rb
class SessionsController < ApplicationController

  skip_before_action :authenticate

  def create
    user = User.find_by(email: auth_params[:email])
    if user.authenticate(auth_params[:password])
      jwt = Auth.issue({user: user.id})
      render json: {jwt: jwt}
    else
    end
  end

  private
    def auth_params
      params.require(:auth).permit(:email, :password)
    end
Here, we use the data in the auth_params to authorize our user via bcrypt. If the user can be authenticated, we generating our JWT, using the Auth library we just defined. Here's the line where the magic happens:
jwt = Auth.issue({user: user.id})
Note that we are encrypting the user's ID, not an email and password. This is because the user's ID is a unique identifier without being sensitive information (like a password).
Note: my auth_params are grabbing data that is nested under the auth key. This is because my client-side application, an Ember app, is structuring data in the authorization request in that manner. You may structure the data in your requests differently, and therefore need to define slightly different strong params.
Then, we are sending the JWT back to the client-side app, as JSON, where it will be stored in localStorage.
Phew!
Defining the current_user Method
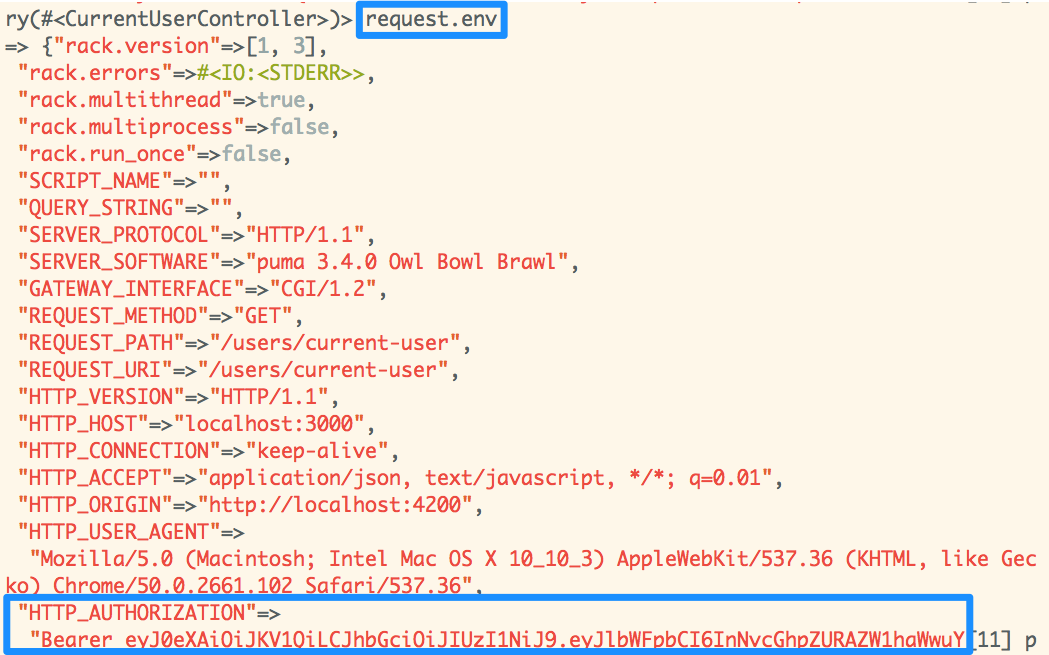
Okay, so, if our client-side app is set up properly, all subsequent requests to our API will include the following header:
"HTTP_AUTHORIZATION" => "Bearer <super encoded JWT>"
So, our current_user method, which we'll define in the Application Controller, will need to decode the JWT. Let's do it.
 # app/controllers/application_controller.rb

class ApplicationController < ActionController::API
  before_action :authenticate

  def logged_in?
    !!current_user
  end

  def current_user
    if auth_present?
      user = User.find(auth["user"])
      if user
        @current_user ||= user
      end
    end
  end

  def authenticate
    render json: {error: "unauthorized"}, status: 401
      unless logged_in?
  end

  private

    def token
      request.env["HTTP_AUTHORIZATION"].scan(/Bearer
        (.*)$/).flatten.last
    end

    def auth
      Auth.decode(token)
    end

    def auth_present?
      !!request.env.fetch("HTTP_AUTHORIZATION",
        "").scan(/Bearer/).flatten.first
    end
end
Some of this code should look pretty familiar: the current_user method is in charge of retrieving the current user, the logged_in? method returns true or false, depending on the presence of a current user, and the authenticate method acts as a gatekeeper, returning an error to the client-side application if there is no logged in user.
Let's dive in to our current_user method.
- First, we check to see if our
requestobject has a header, or a key, of ["HTTP_AUTHORIZATION"] and if the value of that header includes a realm designation ofBearer. If so... - Grab the token out of the value of that header, which would be something like
"Bearer <encoded JWT>"
- Then, in our
#authmethod, we use our Auth library to decode the token:
Auth.decode(token)
- Finally, we use the decoded token, which is now in the below format, and contains a user's unique ID
{user: 1}
to find and authorize the current user.
And that's it!